
Table of Contents
Video blogging is the future, this is what many probloggers have predicted. So, here is a complete tutorial on how to make a YouTube video!
Today’s post is from a special guest who has been a fellow blog community member for a long time.
It’s Angela McCall – a professional designer and a video blogging expert. She is even taking part in a video blogging challenge and I’m glad that she agreed to create a video for all of us.
In this guest post, she has covered all the basic aspects of creating a YouTube video, right from creating an account, preparing to shoot a video, adding special touches, and then uploading it.
This tutorial post will give you a head start in your video blogging efforts so you adjust and equip yourself well for the future of blogging.
So, here’s over to +Angela McCall from angelamccall.com sharing her expert tips on how to make a YouTube video.
[youtube=https://www.youtube.com/watch?v=jbRU_cLm8U4&w=620&h=360&rel=0]
How to make a simple YouTube video ~ Angela McCall ~ YouTube video
Click here to download the transcript
I heard that YouTube is now 25% of the Internet Traffic. Google loves YouTube.
And so if you post something on YouTube, you can easily get up there on SERPs and on Google’s number one page.
How to Start Your YouTube Channel
Five or ten years ago, creating a YouTube channel was simpler than it is today. Now, you have to have a Google+ before you can even create your YouTube channel.
That’s because YouTube is owned by Google. In order to have a Google+ you have to create your email on Gmail.com.
Once you create your email on Gmail.com, you automatically have Google+. Once you have the Google+, you automatically have a YouTube channel.

But say, you don’t have it and you want to create another account or another YouTube account, here’s is a step-by-step tutorial on how to create a YouTube channel from your Google+ account:
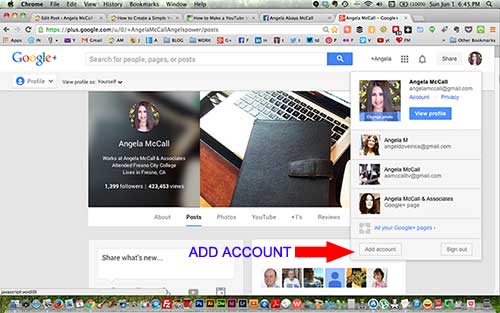
• Go to your main Google+ account
• Click your photo on the right
• On the bottom click “Add account” (if you haven’t sign in, go ahead and sign in)
• Click on “Create an account”
• Fill up all the necessary information in there such as your Name, current email address, password, birthday, gender, mobile phone, etc. then check on “I agree” on bottom then click “Next please”
• Then it will give you a new page. You can add your photo icon for the page either from your computer or the gallery they have set for you already.
• After you entered your photo profile, you can change your cover photo on your new page account.
• On the menu of your Google+, click on YouTube. From there click your YouTube channel.
• Whatever photo icon you have in your Google+ page, the same photo will appear in your YouTube channel. You can change the cover art on your YouTube channel. Upload photo from either your computer or the gallery. Make sure the photo is as big as 2560 x 1440 pixel resolution.
• So, now your YouTube channel is ready to go!
Software You Can Use to Make a Simple YouTube Video
Nowadays, when you buy a desktop computer or a laptop computer, you automatically have a built-in video camera.
Macintosh users use iMovie and PC users use MovieMaker to make their videos.
Or if you prefer to create your video from your mobile phone, you can do that too. Just upload the movie from your mobile phone to your computer and it will do the job.
I have never done a video of myself from a mobile phone but if you don’t have any choice, you can do it from there. Mobile phone can create a simple video.
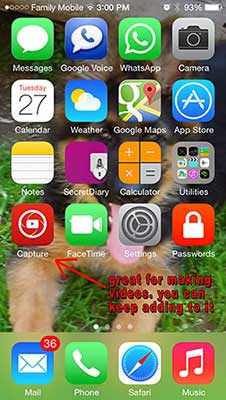

The other day while I was fooling around with my iPhone, I found out this new application called Capture. I tested it.
I could create my own videos and also upload several videos from my previous creations and add music as well.
This application is only available for mac users. I’m not sure if this is available on android mobile device. But I did check and I’ve seen several that are similar to it.
You can also use a regular camcorder to create a simple video. Make sure that it has USB connection for your computer.
Stay away from VHS camcorders since they are obsolete and you cannot transfer your video to your computer.
You can however, transfer your VHS video to computer but it is much more expensive to produce in comparison to a digital video.
If you buy a good camera, you can never go wrong on creating your YouTube video. Nobody complains on a very good video.
If it looks good to you, chances are it looks good to others too. When it comes to filming myself, such as me talking in front of the camera, or me singing a song in front of the crowd, I have to have a good camera.
And I believe wholeheartedly that the video built-in my MacBook Pro is good enough.
Nowadays, iPhone and Smartphone can take great videos. It seems like they make things easier for us to do this. Almost everyone can make a video without a sweat.
Tips on Creating a YouTube Video
To create a simple video, you don’t need expensive camera or lighting.
You can use the lights and lamps you already have at home. If you have a floor lamp, that will help spread the lighting in the room.
Use your desk lamp to aim at your face. You can adjust this with less or more lighting by moving the lamp back and forth, up and down, you get the idea.
You can check the lighting on your computer camera (if that is what you are using to make a video with) and you can either put more or less lights, depending on your taste.
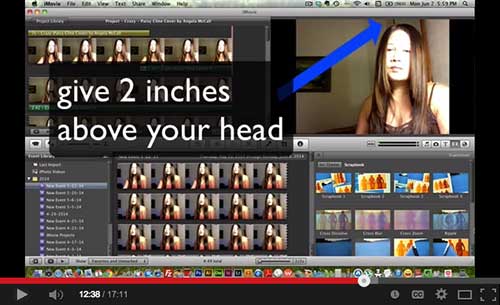

• Make sure you don’t chop your head on video, put a two inches gap above you in the window frame.
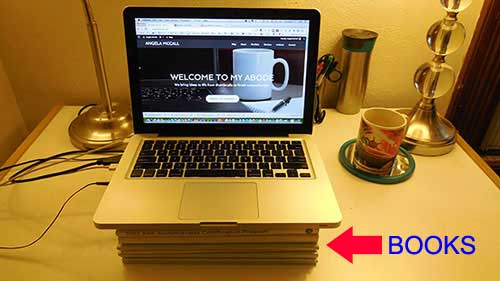

• When you speak to your laptop camera, for instance, stack books underneath your computer. Keep the camera on your eye level. This way you are looking straight ahead to the camera, which will give you an illusion that you are looking straight to your audience.
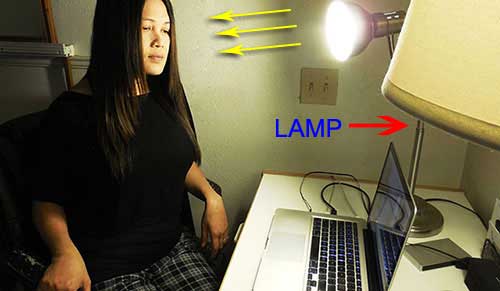

• Direct a lamp to your face if you want to cover some imperfections on your face such as wrinkles, pimples or acne you’re trying to hide. Remember good lighting makes your face look smoother.
• The lights on my face gives me a softer look. When you go to a television production, notice when they are taping their show, they normally aim the lights at the person they are filming with. Now I know the reason why they do that. It makes you look better with the lights on. And you look a lot nicer on the camera.
• Some people actually complained to me that I have too much light on my face. But I like to have that milky and smoother face in front of the camera while I’m singing or talking. I’m not born with a smoother and beautiful face like the models and so when I’m in front of the camera, I like to look my best. At least something that I am not embarrassed to say that is me on the camera.
• If you don’t want too much light on your face, you can put more floor lamps that has 3-ways lamps where you can aim it at the ceiling, to your face, and to the room, this way you have less lights on your face and your natural skin is more conspicuous. Have it your way!
• You can wear make up. But make sure you double your make-up application because the camera will not see it. With the help of make up, this can help make your skin looks smoother and gives you that flawless look. As you can see here, I am not really wearing any make-up here other than eye shadow and liquid foundation. No lipstick. No blush. But my hair just have to look right to compensate for what I didn’t have on my face.
• If you are filming yourself in front of the camera and you have a bad hair day, you can either wear a hat or a bandana around your head. Some people can be sensitive when it comes to hair.
• Wear something comfortable in front of the camera. Do not wear something that itches you or irritates your skin because that can create too much distraction when you are taping.
• When you are speaking in front of the camera, do not move your head back and forth because you can make your audience very dizzy. Try to stabilize your head as much as possible. I’m not saying you should act like a robot but you can practice in front of the camera and judge it for yourself and you will see what I’m saying. (break in 2 parts)
Introduction, Transition, & Cool Effects
Scrolling effect on your YouTube video introduction creates an interesting visual. You can include your Title.
On iMovie, you can create an automatic introduction and ending at the same time.
You can insert Transition and Cool Effects in between your photos to create a dynamic visual effect.
You can put Sound Effects or Background Music if you’d like, whichever is better to present your video.
Recording Tips
Nowadays, all desktop and laptop computers have their own microphone built-in. So, if you are speaking before the camera, I don’t think you need to buy extra microphone just for this.
Unless you are building a recording studio and this is a different story. We are trying to create a simple YouTube video. And you need not to spend extra money just for microphone.
Whether this is my singing videos or tutorial videos, the built-in microphone in your laptop is good enough to record if you’re simply just going to create a simple YouTube video.
When you are recording your video from iMovie or MovieMaker, don’t worry so much about making mistakes.
If you said too many “ahs” and “ohs” and “you know”…you can edit all these and delete them in your video.
In recording your video, it is very important to get your momentum on this instead of stopping, and restarting all over again, which in the end can drive you crazy!
How To customize Your URL on YouTube
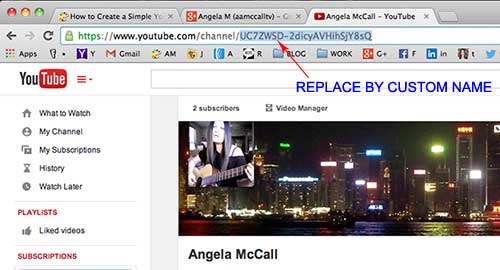
As you can see below the “UC7ZWSD-2dicyAVHihSjY8sQ” is very hard to remember. So you want to customize your channel so that people can remember it a lot better.
Plus, you can also include your URL at the end of your video such as – subscribe at: aamccalltv – instead of a URL with weird characters you can’t remember.

Here’s how you do it
• go to your main channel
• on your icon that looks like a round wheel select “YouTube settings”
• next to your photo icon click “Advanced”
• on Channel settings, click “Create custom URL”
• on the window that says “Create custom channel URL” then click on “Create custom URL”
…this should create a new name on your designated URL.
Now instead of these crazy and hard channel names, you now have your customized URL you created for yourself.
You can easily put the caption text at the end of your video to encourage subscription. Or you can put your customize URL on social media a lot easier for recognition.
Uploading Your YouTube Video
• Go to your main YouTube channel
• Click “Upload” on the right hand corner
• Click the red arrow, underneath says “Select files to upload”
• Select the file you want to upload from your computer
• Put a Title on your video
• Enter your description
• Enter your tags (your tags are the same as “keywords”)
What to Say on Your YouTube Video
Be yourself. Try to relax and don’t sweat too much on what to say on your video. If you’d like you can practice first to yourself.
Create a video of you talking in front of the camera and do not upload it on YouTube. If you want support from your friends, upload the video just for their eyes only.
Then they can give you a feedback without exposing yourself to the whole world.
When you do something often, you become better. Like they say, practice makes you perfect.
So practice…practice…practice…on creating your YouTube video. This is like public speaking, except you are creating a video, and this video you can edit when you make a mistake.
On public speaking, you cannot correct anything if you make an error. So video making has more mercy when it comes to editing.
There’s a lot of things you can say on your video. You can talk about your product, or you can recycle your blog content and talk about it. Google loves that. That’s not duplicating your content.
What you say on your video is different from your actual blog post. You can use YouTube as another format to spread your business online.
This is also good for expanding your audience. You can attract a different set of audience.
I hope you learned something from this tutorial video. If you have any questions, do not hesitate to ask me in the comments below. Please share it with your friends. Thank you for reading my post.
Over to you –
Did you know how to make a YouTube video? If you’ve made one, what were your experiences? What did you learn, and how can you create a better YouTube video? Share in the comments.
Photo Credit: FreeDigitalPhotos, Angela McCall
Disclaimer: Though the views expressed are of the author’s own, this article has been checked for its authenticity of information and resource links provided for a better and deeper understanding of the subject matter. However, you're suggested to make your diligent research and consult subject experts to decide what is best for you. If you spot any factual errors, spelling, or grammatical mistakes in the article, please report at corrections@aha-now.com. Thanks.