
Table of Contents
You know that Google considers your website speed as one of the ranking factors, don’t you? To have a successful blog, you need to know the ways to increase your blog speed.
Increasing website speed means reducing the site load time, so that your site takes less time to open. You can dramatically speed up your WordPress site in easy ways.
One tool that can always help you make your blog fast is a site speed test.
Though site speed tests are only performance testing tools and do not directly increase your site speed, they give you suggestions that you can implement on your own and achieve your aim.
Well, you must be wondering that I’m a super woman who even knows such technical stuff. 🙂
But firstly, I’d like to clear up that improving the speed of your website does not require much of technical knowledge.
Secondly, this is something that my husband taught me and I’m just writing down my training experience, hoping to turn it into a compelling post!
My sole purpose is to help you, just in case you need to fasten your blog speed too. If need be, you can just copy the site speeding process that I’ve described here.
Tell you what, I personally tried the entire process explained in this post and it was a smooth cakewalk.
Therefore, if I can do it, so can you!
Let’s go ahead and get rid of high site load times. Perhaps many of you know how to speed up your website, but some of you either don’t do it or do it the wrong way.
I too didn’t do it the right way until recently, and look how fast my blog is now!
How to Do a Site Speed Test
You can have answers to all your questions if you’ve Google with you, isn’t it?
What you need to do is Google for “site speed test”, and select the top 3 or 4 speed testing websites.
Looking up at the search results, I selected the top 3 sites: Pingdom, Google PageSpeed, and GTmetrix.
You don’t have to look for more because they all vary in their test results and tend to confuse you further.
Your main reason to conduct a website speed test should be to seek the recommendations to make relevant changes on your blog in order to make it load faster.
Did you know that you can also get the site speed stats on your Google Analytics?
You can even check your blog speed on your Alexa ranking page. However, it does not give you any suggestion to improve the site speed.
Okay, all you need to do is just fill in your site URL where it is asked on these three selected sites, and hit the test button. That’s it!
When I tested my blog on these speed-testing sites, I got these main site improvement suggestions to increase my blog speed.
Suggestions to Improve Site Speed
Generally, the elements that make your site slow are – JavaScripts, CSS, and Images.
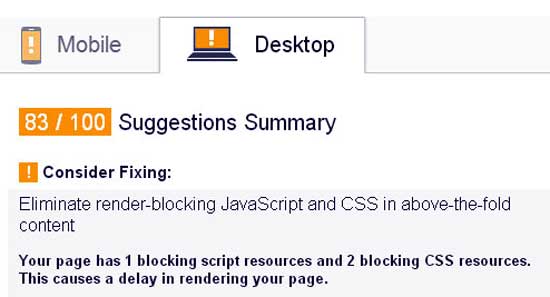
Below is what Google PageSpeed test suggested for my blog, Aha!NOW.
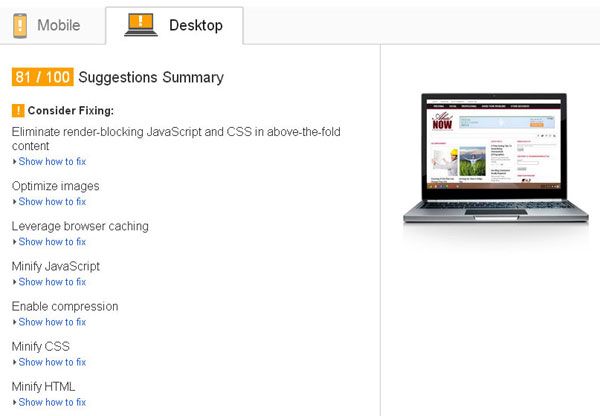

These are the recommendations I received related to these elements from all major performance testing tools – Google PageSpeed, Pingdom, and GTmetrix.
1) Eliminate render-blocking JavaScript and CSS in above-the-fold content
2) Defer parsing of JavaScript or Make fewer HTTP requests
3) Combine external JavaScript and Combine external CSS
4) Minify JavaScript and CSS
5) Optimize images
Some other suggestions were:
1) Add Expires headers
2) Remove query strings from static resources
3) Use cookie-free domains
4) Leverage browser caching
5) Enable compression
So, I’ve these 10 suggestions from website speed test results to help me increase my blog speed.
Honestly speaking, these terms and looked like Greek and Latin to me! I mean I couldn’t understand these recommendations all that much, except the reference to optimizing the images.
But the fact is that you don’t have to know it all. There are facilities and services that do it all for you!
What You Require to Increase Your Website Speed
Let me share the FREE things first – W3 Total Cache WordPress plugin and the popular caching web service, CloudFlare.
Later I’ll also use a paid CDN service to better the website performance, and a couple of other free WordPress plugins.
But the whole process isn’t just simple enough to install the plugin and forget about it.
You need to be careful about the settings in the plugins so they give the best results.
W3TC Setting for Better Site Speed
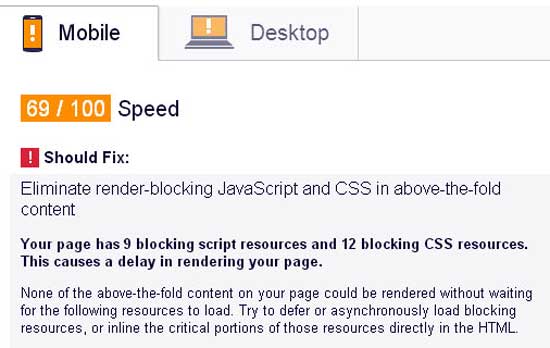
If you performed your site speed test on Google Page Speed, some of you might’ve come up with a recommendation that requires you to “eliminate render-blocking java script and CSS in the above-the-fold content”.

My husband and I struggled with this problem and tried everything possible to remove these scripts from the top part of the blog pages, which seemed like an impossible task.
Moreover, like some of you non-techies, the learning curve was very steep for us, but no matter how vertical it is, if you are determined to scale it – you can!
We found that we could achieve the objective through W3 Total Cache plugin that we use. I recommend you also use it, if you haven’t been doing so.
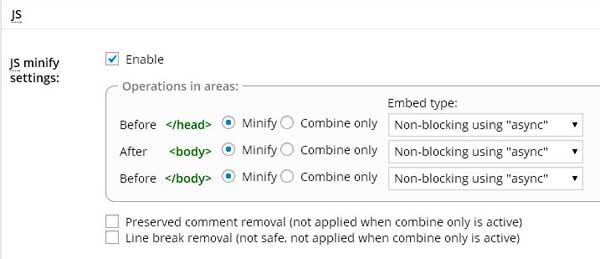
For specific settings to remove render-blocking scripts, do the following in the minify section of W3TC plugin on your blog:
- Choose “minify” in the JS minify settings
- Choose “Non-blocking using ‘async’” as the Embed type

In the JS file management section, do the following:
- First choose your WordPress active theme
- Fill in the render-blocking JS file URL that you see in the Google Page Speed test results
- Add more scripts, so you mention all the render-blocking scripts
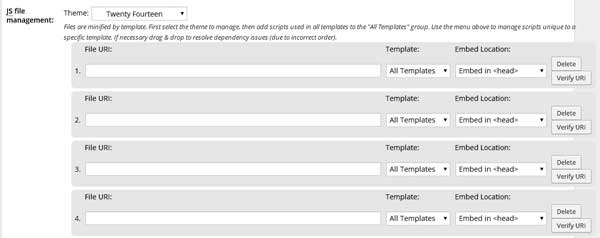

- Choose “All templates” under Template and “Embed in ” as the Embed location.
- To remove the blocking CSS, first enable the CSS minify settings, and fill in all the CSS file URLs that you get from the Google Page Speed test result, in the CSS file management section.
Voila! Hit “Save all settings” button.
As you can see, I had 9 JS and 12 CSS render blocking scripts that caused my blog pages to take more time to load.

Now, after implementing the above, these are reduced to 1 JS and 2 CSS scripts in the above-the-fold area. Not bad, isn’t it?
However, experts say that you need to be careful when minifying scripts – silly mistakes can break your pages.
CloudFlare Setting to Increase Site Speed
CloudFlare is a multi-purpose online facility, and I’d highly recommend you to use its free plan.
It is a CDN optimizer and provides analytics as well as security. Thus, it protects and accelerates your site.
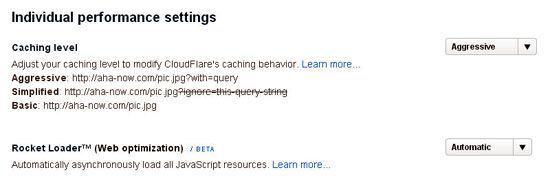
When you use it, go to performance settings under CloudFlare Settings, then do the following:
- Choose “Aggressive” caching level,
- Opt for “Rocket Loader” that automatically reduces the load times of your JavaScripts.

When you’re using CloudFlare in conjunction with W3TC, do not enable the “Auto Minify” options in CloudFlare.
If you enable that, then you won’t be able to use the option to eliminate the render-blocking scripts in W3TC as discussed above.
How is it going so far? Hope you are following all that I mentioned, and if not, you have the comment section to ask your questions.
I think now you are all set to drastically reduce the website load times and make it fast, aren’t you? 🙂
Increasing Website Speed Using W3TC, CloudFlare, and MaxCDN
For the purpose of comparison and reference, I checked the website speed at every stage on two popular online speed test websites – Pingdom and GTmetrix.
I made the first check before I embarked on the speeding journey, when I didn’t have any caching plugin or CDN services associated with Aha!NOW.
These different speed testing website show different results, so probably you don’t get the accurate speed, but at least you get to know what changes help your blog to become fast.


Initially, Pingdom showed a load time of nearly 14 seconds, and GTmetrix displayed a site speed of about 8 seconds for my blog.
Now, this is not considered a good speed.
GTmetrix recommends the website to have load times of below 4 seconds.
There are some speed testing websites that advise blog speed of not more than or around 2 seconds. I know you’d want even faster site speeds.
You need to pay more attention to the page load times or site speed as shown by the speed test results than the reported performance grades.
I tried using only CloudFlare or MaxCDN

But these alone didn’t bring me nearer to my target, which was to bring my site speed to near about 1 second!
This shows that you cannot do without the W3Total Cache plugin, which will help you enhance the power of CloudFlare and MaxCDN.
Using W3Total Cache Plugin
This caching plugin slashes down the load times drastically.
From 14.5 seconds, my blog load time came down to 3.76 seconds! That’s about 74% increase in site speed!!

This was the Pingdom test results; let’s check the other one too.

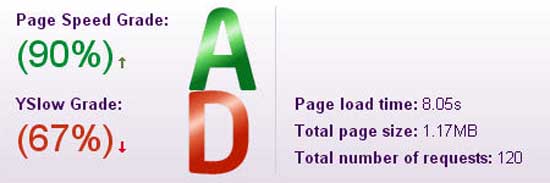
GTmetrix brought the blog load time from 8.05 seconds to 6.16 seconds, which is about 23% increase in speed.
Using W3Total Cache and CloudFlare
I used this combination for a long time. CloudFlare can also be managed from your WordPress dashboard using the W3TC plugin, so you don’t have to go to CloudFlare’s site every time.
These are the speed test results after adding the FREE plan of CloudFlare to my blog.

Pingdom test results show that my blog load time reduced from 3.76 seconds to 425 mili seconds, and that’s under half a second!
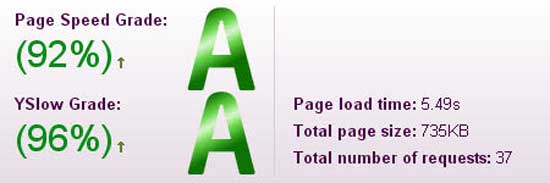
GTmetrix brought it down from 6.16 seconds to 5.49 seconds. Notice that both Page Speed and YSlow grades are “A”. 🙂
Using W3Total Cache, CloudFlare, and MaxCDN
It doesn’t get better than this! These three together beat the site load time blues totally.
MaxCDN
Pingdom reported reduction of my blog load times from 425ms to 344ms, which is just unbelievable!

Did you read that – “Your website is faster than 99% of all tested websites”! Wow!!
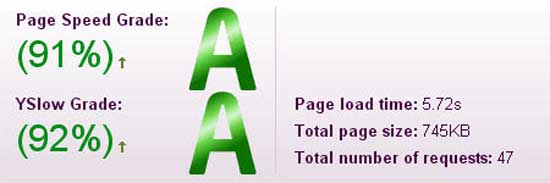
GTmetrix test results did not show much of a change, and the site load time nears to 5 seconds from a bit more than 6 seconds.

While this is good, it made me wonder if I can still make my blog speed better.
Through some research and experiment, I found a WordPress plugin called “BJ Lazy Load”, which was best suited for this purpose.
It worked! This lazy plugin brought down my blog page load time from 5 seconds to under 4 seconds.

You need to remember that these test results vary each time you conduct them, and they’ll show different values if you chose different parameters each time.
Can you really trust the website speed test results?
Personally, I don’t think they’re always accurate. They’re mainly just an estimate and should be used mainly to get recommendations.
Many times my blog showed low load time in the site speed test results, but my real time experience when I surfed the blog was somewhat different.
Is it speedy enough at your end? Let me add that this particular post might be heavy due to excess of images I’ve used.
The test results also vary as per your location and other details.
For performance testing purposes, I kept my test site location be the same on all testing tools – Dallas, Texas, USA. I also chose Chrome as the browser type and DSL as the type of Internet connection, to minimize result variations.
New Kid in the Town
As I was doing the site speed-testing round, I received an update to my WordPress security plugin – Wordfence.
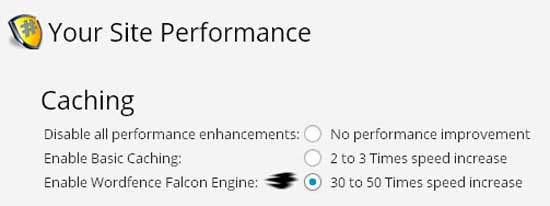

They’ve integrated a caching facility with their security plugin and they claim it’s the best caching option available for WordPress sites.
It’s caching is based on their new falcon engine. It appends the site .htaccess file (very important file!), and asks you to download it first, and then go ahead to increase the site speed by 30 to 50 times!
So how could I miss out on testing this option too?
Boosting Site Speed Using Wordfence, CloudFlare, and MaxCDN
This didn’t take much of time.
I had already mentioned that the site load time was of about 14 seconds by Pingdom and 8 seconds by GTmetrix without using any speed enhancing options.
So, I disabled W3Total Cache and switched on the Wordfence Falcon Engine, and used it as a standalone speed enhancer to my blog.
Using Wordfence Falcon Engine
This was a shocker. The Falcon brought the site load time down by about 87%! Much better than the W3TC plugin.

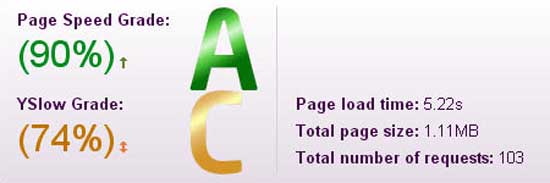
Pingdom showed the site speed up from 14.57 seconds to 1.83 seconds, and GTmetrix from 8.05 seconds to 5.22 seconds.
Using Wordfence and CloudFlare
I added CloudFlare to Wordfence Falcon. While CloudFlare did not show improved site speed with Wordfence using GTmetrix – Pingdom however showed increased speed.


GTmetrix displayed better grades, whereas Pingdom showed reduced site load time from 1.89 seconds to 378 ms.
Using Wordfence, CloudFlare, and MaxCDN
Finally, I added MaxCDN to the combination of Wordfence Falcon and CloudFlare. Again, GTmetrix doesn’t show much of a difference in site speed, but Pingdom also didn’t improve the track record.

It seems that MaxCDN wasn’t very useful if you already had a combination of Wordfence and CloudFlare.
But the BJ lazy Load plugin again made a difference. It brought the GTmetrix speed score to 1.15 seconds! That was my site speed target!!

Now, you really have two good options – either use W3TC or Wordfence’s Falcon caching engine.
The advantages you’ve using W3TC plugin are:
1) You can easily manage CloudFlare and MaxCDN through the dashboard of W3TC
2) You can defer or parse the JS and CSS files
3) You can minify JS, CSS, and HTML
Though Wordfence facilitates good site load times, I guess you’ll have to use other plugins along with it that can minify the JS, CSS, and HTML as well as manage the CDN.
Or perhaps, they’ll be coming up with these supportive features in their future upgrades.
In fact, I didn’t know that you cannot manage a CDN without a caching plugin. As I disabled W3TC plugin, the CDN got disabled automatically.
So, if you need to use CDN as a standalone service or use it along with Wordfence, and if you’re using its Falcon caching engine, then use the CDN Linker plugin. This will manage your CDN without W3TC.
You do not need any separate plugin for CloudFlare, as you can easily manage it from its own site.
Conclusion
I was always conscious and worried about my blog’s speed.
That’s because my blog’s home page is really heavy with so many images, and I didn’t want to sacrifice the present magazine theme for anything else.
This resulted in my site to slow down which probably led to higher bounce rate.
Obviously, who has the time to wait for a site to load, when they can view and read many more sites in that duration?
After going through the recent revelations and experiences with increasing website speed, I would say that a WordPress website definitely needs the triple power of W3TC, CloudFlare, and MaxCDN.
I was able to resolve almost all the 10 problems as suggested by the various speed testing websites and as mentioned earlier in this post.
Just look at this summary of the Pingdom speed test.
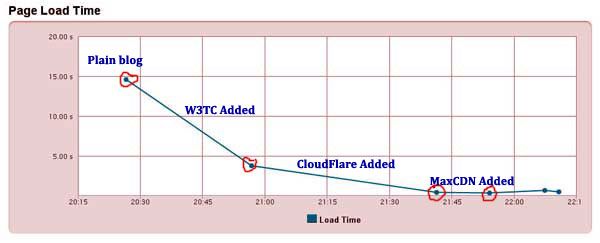

Look at the graph running down. You too can achieve this for your blog in less than an hour’s time, considering if you’ve to register for CloudFlare and MaxCDN
Of course, you can also use Wordfence’s Falcon, which looks very promising, but it’s just come into the market and I’d like to give it some time before really adopting it on my blog.
I hope my experiences with site speed tests will help you decide what’s best for your blog. These are not expert views because I’m no website speed expert, but I just shared things that worked for me.
There is one more option that can impact site speed, and that’s your web host. My blog is on Hostgator’s shared web hosting (aff link) for the last two years, and it is going great, which you can see from the speed results.
But, I’m sure my blog speed will increase more and it will load faster if and when I shift to a better and high-end web host that is not shared.
I know more can be done to enhance the blog speed and provide better browsing experience to the blog visitors.
However, I’m happy with my little effort that I enjoyed sharing with you, and the website speed that I was able to achieve despite being a non-techie.
If you’re a technical person and an expert with increasing website speed, I’d welcome your tips and more suggestions that you can add to take care of aspects that weren’t covered here.
Make the blog comments a great resource and an extension of this post for the readers by sharing your tech wisdom there! 🙂
Over to You –
What did you do to increase your site speed? Which site speed tests do you use and how did they help you? What are the other factors that can improve the website speed? Share in the comments.