
Table of Contents
Do you use presentations in your business or office meetings?
Would you like to create infographics for your blog?
What if you know that there is a tool that helps you do both – create infographics and presentations, and much more!
It can create any type of engaging content, like banners, reports, slides, and even impressive images, just like the one you see on this post.
Yes, I’ve created the image you see above and a few others in this post using the tool I’m talking about – it’s called Visme.
Not just blogs and businesses, but even students, teachers, and all types of professionals can use Visme to create better content.
This is a Visme guide and review, where I’ll explain everything about Visme and take you on a tour to show how to use Visme, and report my observations and assessment.
Visme is a free service with the ability to upgrade to a premium plan if you ever need more features.
Please note that I’ve been provided with the premium version by Visme. Therefore, my review might feature a few things that you may not find in the free version.
This is a comprehensive review about Visme, so you might want to bookmark this post to refer to later.
What Is Visme
Visme is an online application. It helps you create visual content for blogs and businesses, schools and institutions, offices and organizations.
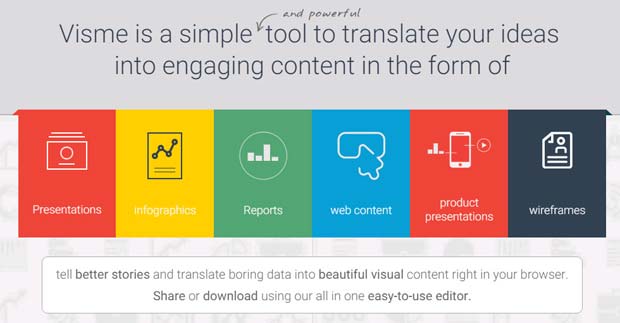
To be more elaborate, Visme is a web-based service to create digital content in the form of presentations, infographics, and other forms of visual content.
Once the digital content is created, it can only be published in the Visme hosting environment, embedded to a website, or downloaded for offline use, depending on your Visme plan.


I’ve used the term digital content because Visme not only allows you to use images and text but also lets you weave in audio and video in your creations.
I definitely agree that Visme is a great tool and resource to translate your ideas into engaging digital content.
In fact, my assessment is that Visme is a 4-in-1 multimedia application. It acts as a:
- Creation platform – Visme provides you the tools and resources to compose audio, icons, images, text, and video, in creative and interesting ways to produce compelling content.
- Storage – Visme also acts as cloud storage for all your creations. You can access your project from any place and any device.
- Engagement medium – Visme makes your published work interactive by allowing comments and engaging on social media by providing social share options.
- Lead generation tool – Visme helps you generate leads for your blog or business by enabling registration to view the digital content.
Isn’t it wonderful to have one application help you in so many ways?
The more I study Visme and learn about its several feature and uses, the more I fall in love with it. 🙂
Do you want a sneak-peek to know what you can really do with Visme? Watch this short video below.
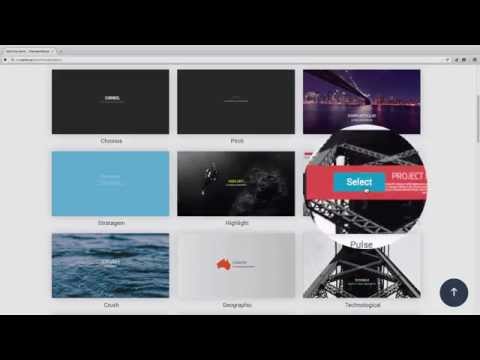
What do you think?
I know what you are thinking – you can do a LOT with Visme.
“Check out the review of Visme – a multi-purpose online application for creating awesome digital content.” Tweet
You might have two more questions in your mind – do you really need to use it, and it might be difficult to learn it.
Well, when I started using Visme, I had these questions in my mind, and I got the answers to them. Let me share them as it might help you.
Why You Should Use Visme
Visme makes creating content easy.
Till date, I’ve been using the image editing software Adobe Photoshop to create images for my blog posts. Since I’ve some experience working on this application, creating images using it is easy for me.
However, there are a few drawbacks while using a traditional image editing application:
1) You do not have access to many essential icons and shapes to use on the images.
2) You have to seek external resources to search for images that you need to work on.
3) You cannot make charts and diagrams with ease and speed.
4) You’ve limited ways to design your text in the image.
5) You need to have the software installed on your computer or laptop.
Additionally, as a blogger, I don’t always need the advanced features of Adobe Photoshop or any other image-editing or creating software.
In fact, the less the features, the more simpler it gets for me. What I need is just the essential features that make it easy for me to create visual content and save me time doing it.
There are many image-editing applications online, but they don’t provide the versatility like that of Visme, which is also called as the Swiss knife of visual content!
“Visme is the ‘Swiss knife of visual content’ – check out the ultimate guide and review.” Tweet
Visme also has the right tools and resources to create infographics; it’s something that I always wanted to do and was on the lookout for a good tool.
It has readymade templates, icons just about for anything, and special infograph widgets.
Talking of creating presentations, Visme is a good alternative to Microsoft PowerPoint.
Again, you do not need all the features and complexities of PowerPoint when your needs are few and simple. That is why Visme is one of the leading presentation tools online.
Visme also offers a simple method to animate the presentation objects or add motion to any object in the presentation. (Check it out in my Visme presentation)
Visme has just the features you need to create simple, but effective presentations. It does not burden you with more-than-required features and keeps your learning curve pretty flat too.
I like Visme for these reasons.

How To Use Visme
Getting started with Visme is easy. I hope you saw the video at the beginning of this post. It gives you some idea of how to use Visme.
If you’ve used any image editing or presentation creating an application before, you will find it easy to understand and use Visme.
However, even if you’re a starter, it’s no big deal. Understanding and using Visme is easy because its interface is very intuitive and self-explanatory.
If you ever face any problem, you have many instructional guides, how-to’s, and tips and tricks on their site.
You can even contact the support and receive a timely response.
Creating Infographics and Presentations Using Visme
The beauty of Visme lies in its simplicity.
There are only two essential components of Visme – the design area and the tools.
You’re like an artist when working on Visme – with an idea in your head, a canvas in front of you, and a tool palette in your hand.
Just as the artist creates a masterpiece using the brush and a variety of tools, you also use many tools and its various options to create engaging content.
The basic application layout, tools, and resources, are the same, irrespective of what type of visual content you want to create using Visme.
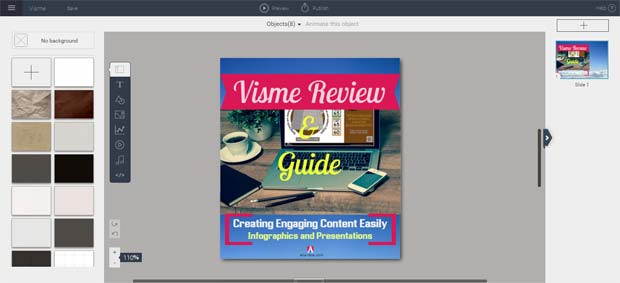

Design Area
I find that the only difference between all the typical visual content on Visme is the “Canvas Size”. You can use the default banner, infographic, and presentation size options, or create your own custom sizes.
There are hundreds of readymade infographic and presentation templates available on Visme that can help you start working right away.
You can always change the name of your creation, show grid, or use the snap to objects options to facilitate easy placement of objects.
Whatever you create on the canvas using the tools is called an object. There can be any number of objects on your canvas or every slide, and these can be animated by making them appear in a timeline.
All objects, whether text, shape, or image, when left-clicked show a bounding box with corner handles and a rotation symbol, which help to stretch, compress, or rotate the objects by clicking and dragging.
Left-clicking also brings up a vertical menu with the options to change the color of the object, the layer position, copy the object, hyperlink it, apply opacity, and delete the object.
Right-clicking pops up a menu with the options to arrange, copy, paste, duplicate, lock, unlock, and delete the object.
If you’re creating a presentation, you can easily add slides by clicking on the “+” button on the right sidebar.
You can always delete, duplicate, or hide the slides by clicking on the gear icon on the right sidebar slide thumbnail. You can also select the slide transition effect and its trigger.
You can re-order the slides by simply clicking and dragging them in the right sidebar.
You always have the options to redo, undo, and zoom in or out. You can simply change the slide size by dragging the bottom bar.
I really like the simplicity of the design area. Not having too many options and menus is a blessing – it leaves me with fewer things to manage and think about.

Tools
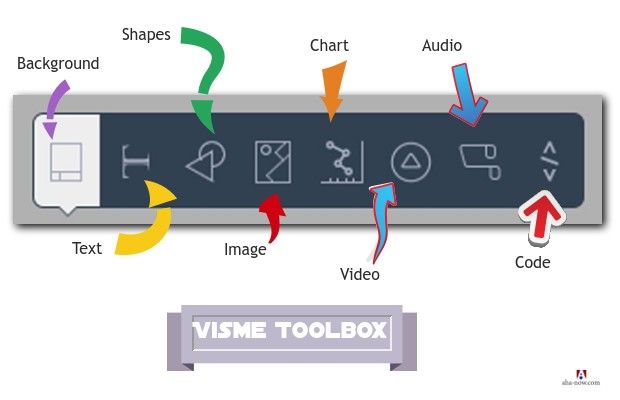
The toolbar on the left-hand side of the workspace displays eight tools. They are the background, text, shapes and icons, images, chart and widgets, video, audio, and HTML code tools.
Background – By default, the background tool is selected when you create a new canvas or Visme.
You have the option to choose one of the existing background patterns for your slide, have no background at all, or create your own solid color, gradient color, or an image background.
Text – The text tool consists of three parts – regular text, animated text, and text widgets.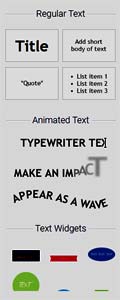

The regular text gives you the option to create normal text, title, quotes, and bulleted text.
The animated text gives you the option to animate the text in three different ways for presentations or animated banners.
The text widget gives you the option to write a text within different kind of shapes. This is something that is very helpful in enhancing the visual impact of your creative work.
When you left-click on any text object, you also see a settings menu with options and a text formatting bar on the top.
- You can use the menu options of settings to fill the text box with color, add padding and spacing in the text, transform the text, and apply a shadow or boundary to the text box, etc.
- You can change the text font and choose from over 100 professional fonts, size, color, and apply other formatting using the text formatting bar.
You can apply a font/style to a single word and maintain a different font/style for the rest of the text block.
The Visme text tool literally takes care of all the text formatting needs. However, I wish I also had the option to add an outline to my text. 🙂
Shapes & Icons – The shapes and icons tool helps you depict besides the basic shapes, lines, and arrows, the icons for different aspects related to 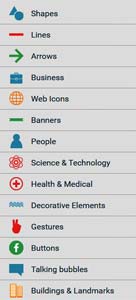

The various options include shapes and icons for people, health & medical, science & technology, decorative elements, gestures, buttons, logos, talking bubbles, and much more.
You also have access to menus by left and right clicking on the shapes to perform more actions.
I think the shape tool is one of the features that attracted me to Visme. This is very useful in creating infographics apart from other visual content.
Images – The images tool gives you two options – place an image on the canvas from the image repository of Visme or upload your own image.
- You can conduct a search for the image of your choice using your keyword in the search box.
- Left-clicking on the image brings up additional menu options to crop and replace the image. It also has the effects options to apply opacity, reflection, and drop shadow on the image.
- Right clicking on the image give you the additional options to flip and replace the image.
I certainly have more image editing options in Adobe Photoshop but I rarely use them in creating the images for infographics and presentations. The reflection feature here is what you might not find elsewhere.
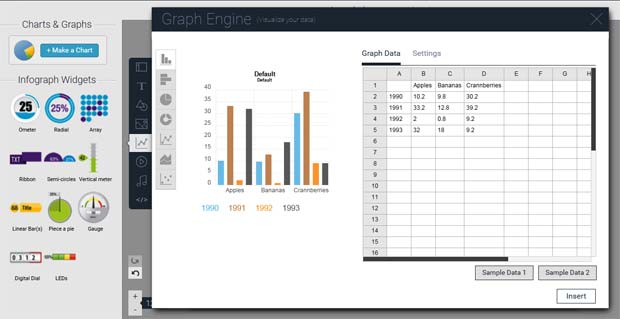

Charts, Graphs & Widgets – The charts, graphs, and widgets tool help you visualize your data.
Clicking on ‘Make a Chart” brings up a window where you can enter your data and depict it graphically in the form of a bar graph, pie graph, donut graph, normal graph, scatter plots, and other visualization ways.
You can customize the chart regarding colors and text using the settings option, and insert it as an object in your creative content.
You can also import spreadsheet data and generate a chart on the fly from the imported data.
Double-click on the chart to edit the data and replace the chart with the revised version automatically.
The Visme chart tool and options is no doubt much simpler than that of Microsoft PowerPoint.
And then there are the “Infograph Widgets” that help depict figures and stats in graphical terms on the infographics.
Video – The video tools helps you insert a YouTube or Vimeo video in your presentation.
You simply have to insert the video link and choose from the options to show the control bar, auto-play, make the video play in a loop, or keep it muted.
Audio – The audio tool lets you select a musical score from the inbuilt free Visme audio library, add your own audio in the.MP3 format, or record the audio in your own voice.
- You can add a unique audio to each slide.
- After you attach the audio to the slide, clicking on the gear icon and more settings gives you the options to fade in or out the music, start playing it after a certain duration, adjust the volume, and play it in a loop.
HTML – The HTML tool helps you to insert iframes by pasting the code into the box and clicking on “Done”.
You can insert the iframes banner code of your affiliate, a corporate badge, etc.
For me, Visme fulfills all my image editing, infographics creation, and presentation making requirements that I used to fulfill by working on two different applications – Adobe Photoshop and Microsoft PowerPoint.
“One amazing application for creating infographics and presentations – check out the Visme review & guide.” Tweet
I find it amazing that these eight Visme tools offer the features and functionalities of many advanced image creating and presentation making applications. You literally get to do everything using Visme.
Tip – You can always preview any slide/slides even when it is not published and your work also gets auto-saved, however, you can always manually save it too.
Publishing Visme Creative Content
You have the option to publish your engaging content created with Visme in three ways:
Share – You can share the link of your awesome content on Visme to your accounts on the social media directly through the Visme publish box. You can even email the link of your published work.
Embed – You can embed the HTML code of your published work on any blog or site by simply copying and pasting the code there.
The good thing is that you can embed your published work in a responsive mode so it can be viewed on any device, including mobiles and tablets.
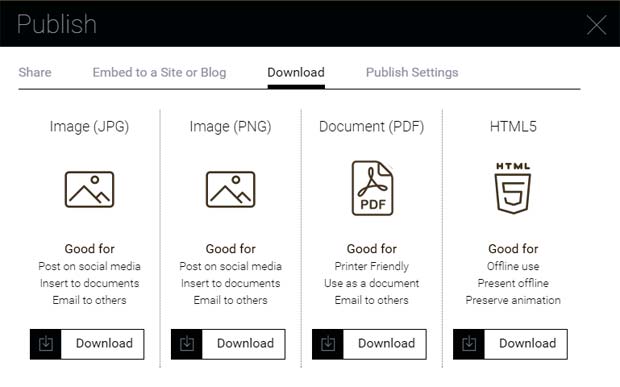
Download – You can download your published work as a JPG or PNG image, PDF document, or as an HTML5 document.

There are more publishing features that might interest you as mentioned below.
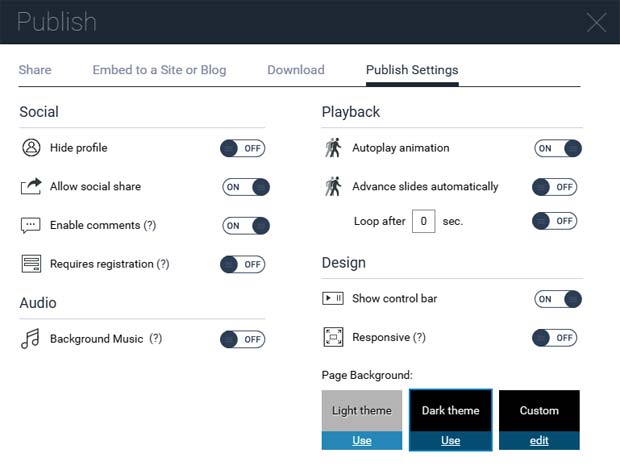
You also get access to many publish settings such as allow or disallow the display of profile, social shares, comments, background music, control bar, and other settings.
This means, if you use Visme to showcase your work, you get so many additional options to make your content engaging and go viral.
You can also select to autoplay the animations in the slides, advance the slides automatically, and put them into a loop.

Bloggers, Internet marketers, and businesses can collect leads or viewer information through a registration form that can be made compulsory to view the content. The leads will be available in the Visme Dashboard, which can later be downloaded.
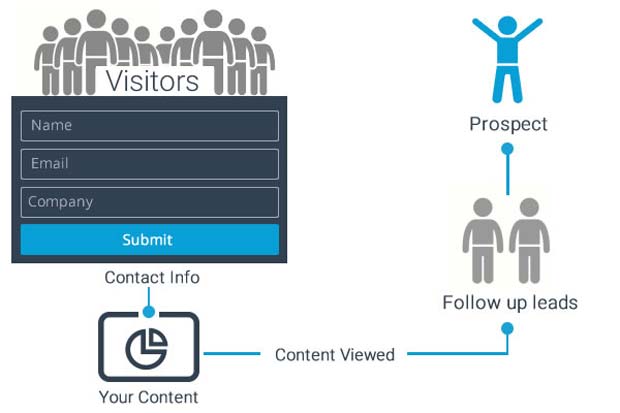

I guess the ability to generate leads makes Visme a better choice to host your slideshows than elsewhere.
Needless to say, you have full privacy control to make your content public, private, or password protected.
Accessing Analysis of Visme Content Traffic
Finally, Visme offers you advanced analytics to gauge the effectiveness of your digital content creation and promotion.
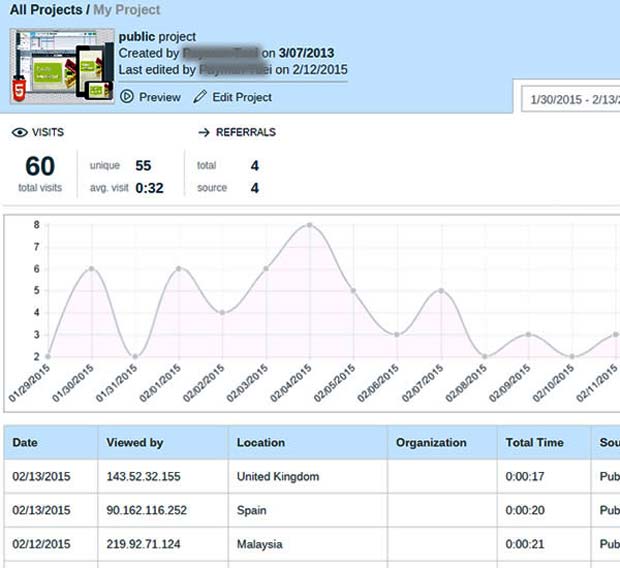

The analytics section on the dashboard shows the total visits, unique visits, average visit time, referrals, and other details of the content that is viewed on your Visme content page.
Wrapping It Up
Visme is the savior and solution for those who do not have the experience of designing. It’s a boon for those who prefer a single application for multiple purposes and want a quick and simple way to create professional digital content.
I can write more about Visme but I fear this post will get too lengthy. Instead, I created a short presentation using Visme so you can get a feel of the Visme presentation capabilities.
Check out my Visme presentation
Here’s the recap of who, what, and why of Visme –
Who Can Use Visme
- Bloggers
- Marketing and Business professionals
- Teachers
- Students
- Designers
- Non-profit Organizations, etc.
Visme can be used by just anybody and everybody, and it is especially great for those with no designing experience.
What Can Be Created Using Visme
- Blog post images
- Website banners
- Infographics
- Presentations
- Animations
- Reports
All visual content needs can be fulfilled to create engaging content.
Why Should You Use Visme To Create Visual Content
- Bring your stories and data to life
- Simple tool to translate your ideas
- Create engaging content quickly
- Single application for multi-purpose uses
- Access analytics and generate leads
- Online-based software with team capability
Visme also offers special features for teams – all users can organize their projects in folders and collaborate with other team members. As the admin, you can manage their access levels by setting permissions, and manage and track the activities of each user.

Visme helps you become a better presenter, communicator, and storyteller; all while saving you time and the costs implicated in acquiring expensive programs or hiring an expert to do it for you.
The ability to publish a project and access it in various forms also gives Visme an edge over other online tools.
There might be many infographics and presentation tools online, but Visme is any day better because it is easy to learn and use by courtesy of its drag and drop features, and allows full capacity to create content that services the specific needs.
PROS
Everything! It’s been an awesome experience working on Visme. It’s my new home. 🙂
CONS
While there aren’t any, the images resource search option could probably be improved, so the search results deliver exactly the images you require.
If you find any feature that is not up to your expectation or not there at all on Visme, you can use the feedback to share your ideas and they might even be incorporated in the future versions of Visme.
Though the free basic Visme plan with limited features is good enough, I’d say that for less than 25 cents or 55 cents per day, even the standard and complete premium plans are a steal deal.
Over To You –
What do you think of Visme? How do you create your digital content? Would you try out Visme for free to create your images, infographics, and presentations? Please share your views in the comments. Thank you.
Disclosure: We are an affiliate of Visme and will earn a commission if you make any purchase, however, you’d NOT have to pay extra in any way. That said, the basic Visme plan is free and does not require a purchase. The opinions expressed in the post are my own and I’m a user of Visme.