
Table of Contents
UPDATE: We are not using the Icegram plugin anymore. You may not be able to view some examples in the review that we had created using the plugin features. Instead, you will only see the shortcodes because the Icegram plugin is not installed on this blog.
This is a post for all WordPress and non-WordPress bloggers. If you haven’t started blogging but plan to do so, then you need to bookmark this post.
Talking about your blog, the most important aspect, besides quality content – is the engagement of visitors.
Even the blogs that have quality content and an impressive design, either fail to hold the visitors longer on the blog, or are unsuccessful in informing them about the other goodies on the blog.
This is where Icegram comes into the picture.
It provides you with features that help to decrease bounce rate, increase engagement, and grab your visitors’ attention.
The best thing about Icegram is that it is a free WorldPress plugin. Yes, you read it right – it’s a free plugin that you can use for a lifetime!
But you can use it even on non-WordPress blogs.
If you are interested, read further.

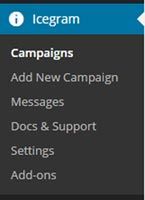
What Is Icegram WordPress Plugin
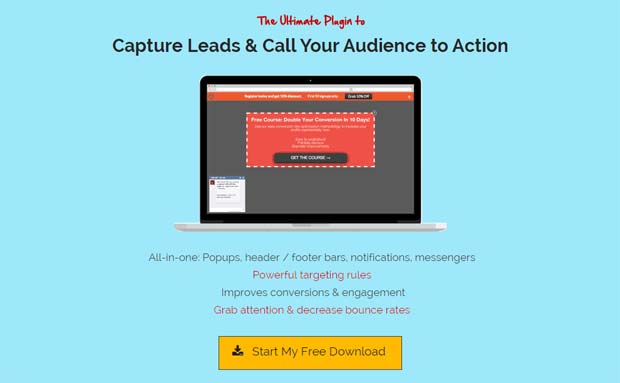
Icegram is the ultimate WordPress plugin to capture leads and connect with your audience.
This is what the makers of Icegram say, but I too came to agree upon as I started using it.
It is a marketing and retargeting tool, with the primary purpose to engage and convert your visitors.
It helps to sell your products, services, affiliates, or blog features to your blog visitors by bringing these into their notice.
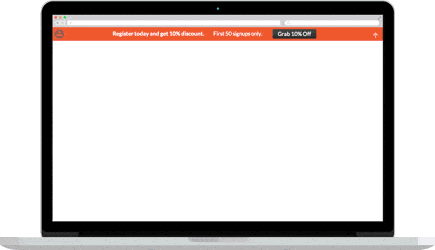
Icegram does not display simple banners. Instead, it displays messages that are bundled with targeting rules.
So, these messages act as per your requirements.
That’s right; you make them behave however you want them to, being in total control.
I’m sure you encountered such messages when you visited this blog.
There are many possibilities or ways of making effective and efficient delivery of your message.
These are called campaigns.
Apart from the various targeting rules, you can use different themes that Icegram provides within these campaigns.
You can choose your layouts and formatting options, and even add multimedia content like audios and videos.
There are many reasons to use Icegram on your WordPress blog (and remotely use it on non-WordPress blogs as well), as you will read below.

This animation gives you a glimpse of what you can do
with the free Icegram WordPress plugin.
Why Use The Icegram WordPress Plugin
Icegram is free, but so are many other WordPress plugins. I know you’d say that!
The features that Icegram provides may be present in a few other WordPress plugins, but they may not be free in the real sense.
What makes Icegram different is that it has four features, which are generally available as separate plugins. In other words, Icegram is a 4-in-1 plugin (as you will find later, it’s much more than that!).
Icegram adds four major marketing features to your blog. They are:
- Popups
- Header/Footer Bars
- Toast Notifications
- Messengers
Speaking of myself, I always wanted to have these features on my blog. But I didn’t want to install so many plugins for the various features.
Therefore, when Icegram contacted me to try their plugin, I did and made no delay in installing it on Aha!NOW.
Here are two more reasons to use Icegram:
- It is full featured with no limitations
- It does not come with any forceful display of Icegram branding
You may have come across some free WordPress plugins that offer full functionality, but only for a limited duration, or only in their pro or premium plans.
Even if they offer full functionality, as long as you use their free plugin, you’ve to exhibit their branding on your blog.
This does not happen when you use the free Icegram WordPress plugin. You can create unlimited messages and campaigns, and use it for lifetime.
There are three more advantages of Icegram:
- It can integrate with all major mailing list, newsletter, optin, CRM, form services
- You can embed forms in Icegram messages using shortcodes
- Icegram is responsive and includes smart, responsive template designs
You may come to like Icegram and find many other reasons to use it as you learn more about it.
And yes, even if it is a WordPress plugin, you can extend its features to non-WordPress blogs. Read further to know more.
The Icegram WordPress plugin has many more features available as free and premium add-ons.
How To Use Icegram WordPress Plugin
Learning to use the Icegram features is not difficult, but it depends on your degree of comfort and expertise with WordPress.
I felt the need of a simpler and clearer step-by-step approach to using the plugin. I could not clearly understand some concepts.
But don’t worry; I got you covered with my comprehensive and exhaustive review to help you set up your campaign in minutes! You can also treat this as a mini-guide or your manual to Icegram. 🙂
In a nutshell, all you need to do is:
- Create messages
- Add targeting rules to create a campaign
That’s it! Publish and experience the campaign live on your blog.
Let’s first understand the basics of Icegram.
Messages
Messages are at the base of all marketing and re-targeting campaigns that you will create using Icegram.
They are like banners, but more than that.
You can have an image, title, body text, button with a call-to-action (CTA) text, destination link, different themes, and different behavior settings for these messages.
To create a campaign, you first need to create a message.
However, messages can work standalone. I mean, even if they are not a part of any campaign. I explained it in a later section, where we create messages.
As mentioned before, there are four types of messages: Popups, Action Bars, Toasts, and Messengers.
Read more about these messages in the image given below:
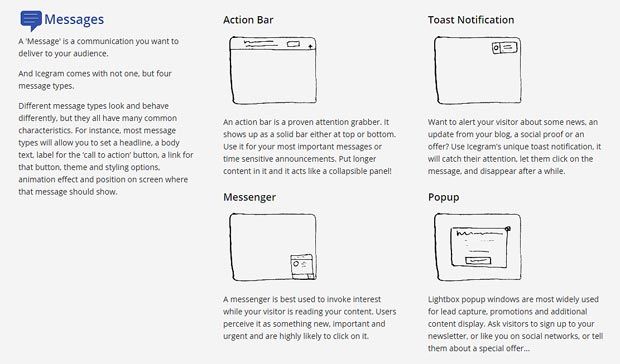

For every message that you create, you’ll get a drop down box and options of the four types of messages to choose from.

You can use the same message for different campaigns.
There are more message types available as premium add-ons.
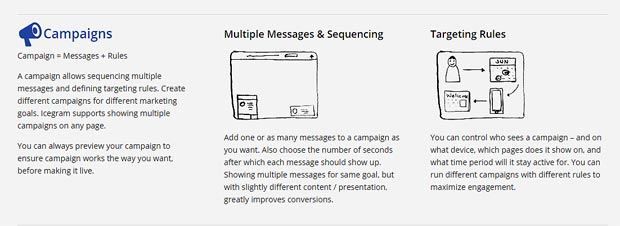
Campaign
Campaigns are messages combined with rules to govern their actions or behavior.
In a campaign, you can use one message type or have all the message types altogether. They can be arranged in a sequence.
For example, you can first show a popup, and then an action bar. This can be followed by a toast notification, and lastly end with a messenger.
You can also target a message especially for certain type of visitors, devices, pages, etc.
Campaigns are meant to carry out a specific purpose or task. You can have more than one campaign on a page.
Read more about campaigns in the image given below:

Now that you know the basics of Icegram, let’s go ahead and install Icegram onto the blog, and create our marketing and re-targeting campaigns.
The basic Icegram WordPress plugin as reviewed below is FREE. You can download it and use like any other free plugin.
Review of Icegram WordPress Plugin Features
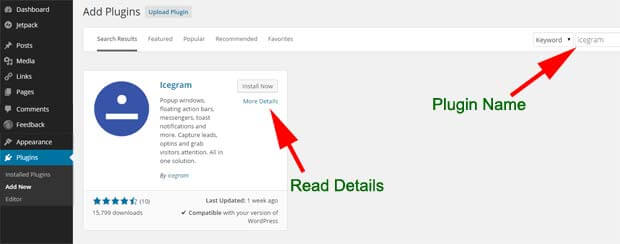
We download Icegram just like any other free WordPress plugin from the WordPress plugin repository.
Just go to plugins, click on “Add New”, and type in the plugin name. Do read the plugin details before installing.

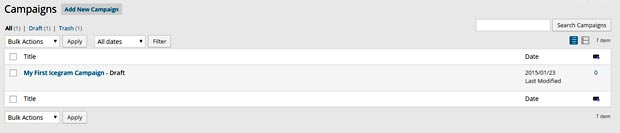
After installation, you will see a welcome window.
There, you have the option of editing and publishing a readymade campaign, which lies in the draft mode. You can preview it to get the feel of how the Icegram messages look on your screen.
Also, as you can see in the below image, you get pre-created and published messages demonstrating the basic four types of messages.
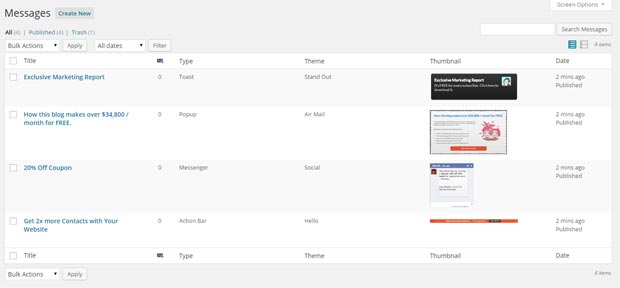

Studying these will give you an idea of creating them yourself.
You just need to edit and modify them as per your requirements.
Remember that the messages will not be live on the site even if they are published, until they are added in a campaign or used through their shortcodes.
I will go ahead and create a new message to show it you.
Just click on “Create New”. You can also use the dashboard sidebar options.

However, before you get ahead with the task of creating messages and campaigns, you first need to plan what you want to do and achieve.
Without proper planning, your efforts and the useful features of the Icegram plugin may go waste.
Creating a Message
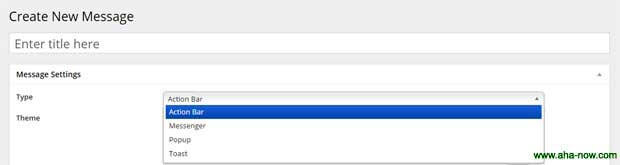
When you create a new message, you get a form as shown in the image below.
If you checkout all the four readymade messages, they all have a form of almost the same format.
The only choices you need to make are in the form options of “Type” and “Theme”.
The “Type” option helps you choose to create a message type from the four given options of the drop down menu, namely action bar, messenger, popup, and toast.
You can choose only one type for one message.
Each message type has its own themes to choose from.
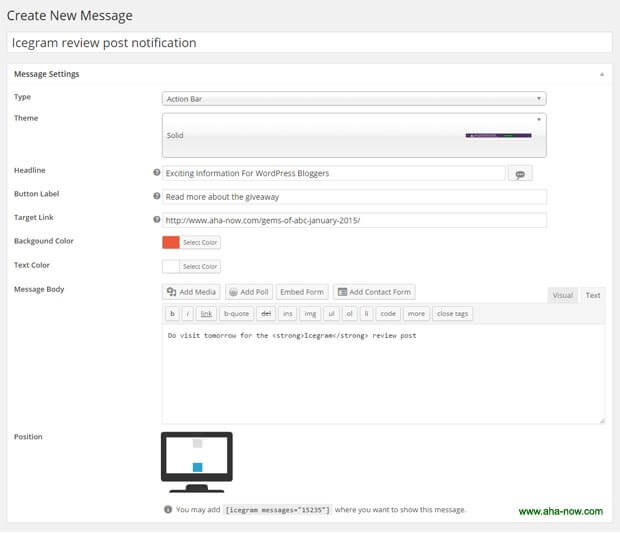

If the message type has an option of animation, you see an additional “Animation” option. And if the message type has placement option, you see a form option called “Position”.
In the above demo, I created an action bar for this Icegram review post. I entered that heading at the topmost field to give a name to this message.
As you can see, I chose the “type” as “Action Bar”, “Solid” as the “Theme”, and the “Position” as bottom of the screen placement marked by a blue square.
I filled up the rest of the form options as per my requirements, and these options are self-explanatory. Besides, you also get online tips if you hover the mouse over the question marks, in the black circles.
Remember that you can override the color you’ve chosen in the message, from the options in your campaign.
You can see a “Headline Generator” button besides the “Headline” form option with the text “Give Me Another Headline.”
(Advice: If you already wrote a headline, copy it before clicking on this button)
It will help generate better and effective headlines by offering some successful sentence styles with blanks, which can be filled as per your requirement.
You also get the facility to show the messages on your site using shortcodes for each message, if you do not want to create a campaign.
Just go to Appearance > Widgets.
Choose the text widget and add it to any of the existing “Widget Areas”.
Copy and paste your message shortcode in the text widget.
Your message will be displayed on your site, but you cannot apply any targeting rules to it since it is not part of any campaign.
After creating and publishing a message of one type, you can click on “Create New” and create a message of another type.
You can create as many messages as you like.
With the premium add-ons, you get to use some targeting rules and even sequencing with the messages alone, without creating campaigns.
Creating a Campaign
The readymade campaign has all the four message types in it for you.
You can create your own campaign by clicking on “Add New Campaign”.

Campaigns are created to add the targeting rules to the messages.
I can display a message without creating a campaign, but I will not be able to control its behavior or on-screen result.
Suppose, I only want the logged-in users to see a specific message on their mobiles, after a certain duration, only on selected pages, on specific dates, and don’t want them to see the message again if they have seen it once.
Only targeting rules can help you achieve this behavior functionality, and you need to create a campaign for this purpose.
Let’s “Edit” this draft sample campaign to understand the Icegram campaigns.
Here is how you create a campaign:
- Give a name to the campaign
- Add a pre-existing message or create a new one
- Complete the settings of the message
- Add more messages/message types if required
- Complete the settings of all the messages
- Add time in “Show after” if you want the messages to appear at different times
- Define the targeting rules that all the messages will follow
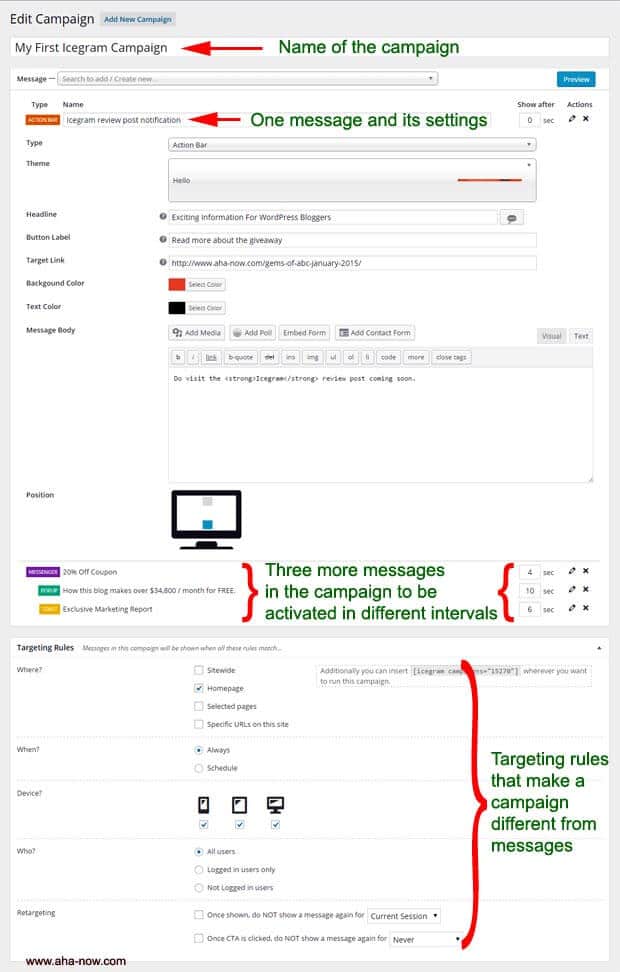

You learned how to create a message and complete its settings in the previous section.
Additionally, you can have many messages displayed at different intervals.
The basic targeting rules are self-explanatory.
- You can choose where to show the messages on your site, as you even have the option to exclude specific pages, or show only on specific pages or posts.
- You can even schedule the campaign for specific date or dates, show on all or any one of the commonly used devices for browsing, namely mobile, tablet, and desktop/laptop.
- You can further segment your audience in three categories – logged-in users, not logged-in users, or all users. This is helpful for registration-enabled and membership sites like Aha!NOW.
- Lastly, you can set a re-targeting duration to display the campaign again, after it is once shown or clicked.
Once you have created and published a campaign, you can click on “Duplicate” to create its copy to start a new campaign, or create a new one right from the start by clicking on “Add New Campaign”.
Remember, that you don’t have to create messages in the “Message” section and then arrive in the “Campaign” section.
You can create messages while creating a new campaign in the “Campaign” section, and those will also appear in the “Message” section.
That’s all about the Free Icegram WordPress review.
You get more behavior and targeting rules with the premium add-ons.
Icegram WordPress Plugin Premium Extensions And Add-ons
I was just kiddin’! The real review just got started, that was just the trailer. 🙂
Icegram has more goodies to offer you.
Some are free, and for some you need to pay a little.
But these free and premium add-ons really add a range of functionalities to your marketing campaigns.
Non-WordPress bloggers too will know how to make use of this WordPress plugin on their blogs.
Let me help you understand the premium add-ons and extensions better.
Clicking on “Add-ons” in the dashboard sidebar will bring you to this screen:
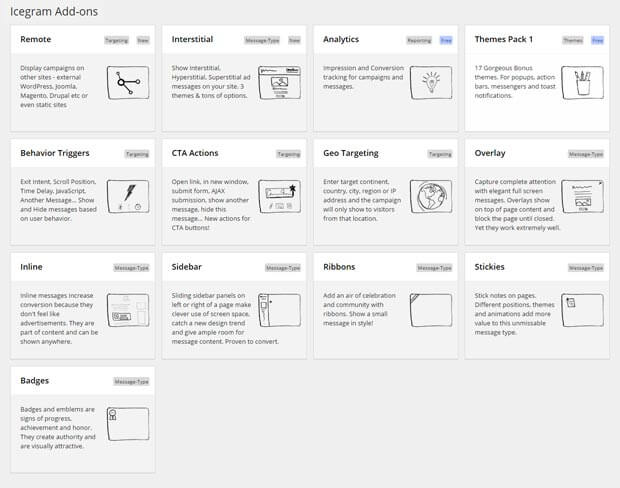

Presently Icegram offers 11 premium add-ons and 2 free add-ons that you can use along with your free Icegram WordPress plugin.
These extensions and add-ons range from $7 to $25 for annual subscriptions.
If you want them all, then you can opt for the Icegram Super Bundle that comes at a bargain price of $49 for a single site.
For details, visit the Icegram website.
(Icegram presently does not have an affiliate program, so there are no affiliate links in this post. Just letting you know. :))
Let’s briefly analyze the add-ons.
Remote and Interstitial add-ons are not a part of the free Icegram Super Bundle that was offered to us, so we cannot review them.
How to Add the Icegram Extensions and Add-ons
Once on the Add-ons page of the Icegram website, click on the Add-on you want to download, choose the license type, and click on “Add to cart”.
After that click on “View Cart”, and then click on “proceed to checkout.”
On the check out page, fill in your billing details, read and check the terms & conditions, and click on “Place Order.”
If it’s a paid Add-on, you’ll need to make the payment online. (But if you are a lucky Aha!NOW reader, you can get it for FREE!)
On the new checkout page, you will find the plugin file link to download, in a zip format.
(If you ordered the Icegram Super Bundle, you can re-visit your download section anytime by clicking on “Login to My Account.”)
Then go to your blog dashboard sidebar > Plugins > Add New > Upload plugin > and click on “Choose File”.
Choose the Add-on zip file you just downloaded and click on “Install Now.” Then, activate the plugin.
(Advice: If you use a caching plugin, then you may need to empty the cache)
You need to repeat the process for all add-ons.
The Free Icegram Add-ons
You can download two Icegram WordPress plugin free add-ons – “Analytics” and “Theme Pack 1”.
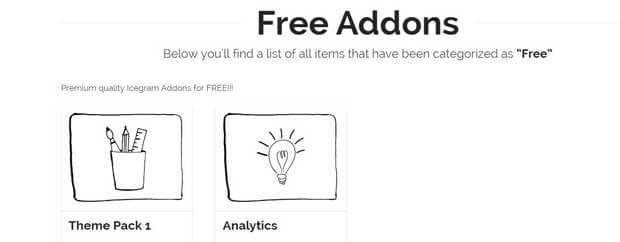

Analytics
After installing and activating the “Analytics” plugin, you can view the impressions, clicks (conversions), and the conversion ratio (%) of your campaigns or messages.
This data appears on the “Messages” and “Campaigns” overview pages as “Quick Stats”, and also at the top of the individual campaigns and messages as shown below:


(You can reset the stats by clicking on the blue circle)
Theme Pack 1
After installing and activating the “Theme Pack 1” plugin, view the “Theme” option in every message type.
You will find new message templates to use in your Icegram campaigns.
Once you have downloaded Icegram and Icegram’s add-ons, even the premium ones, you can use it for a lifetime. Even if your yearly subscription ends, you can continue using the add-ons. For more details, contact Icegram.
The Premium Icegram Add-ons
You can download eleven Icegram WordPress plugin premium add-ons. However, if you are an “Icegram Super Bundle” user, you will have to pay extra for the “Remote” and “Interstitial” Add-ons.
Behavior Triggers
After installing and activating the “Behavior Triggers” plugin, you get new triggers to show or hide your messages and campaigns.
This image will explain it all to you.
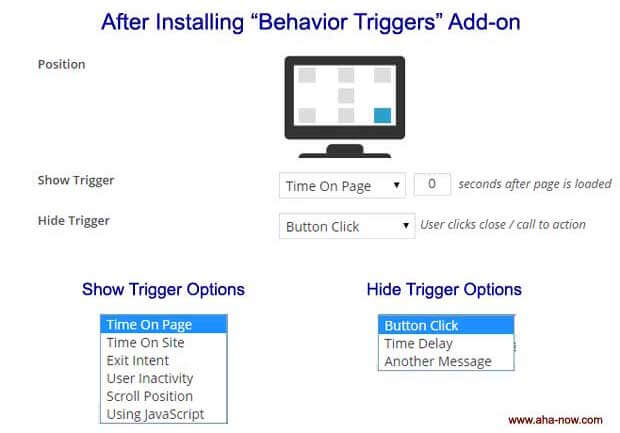

I tried the “Exit intent” to display an invitation to the Aha!NOW Blog Community, but you can do so many things using these behavior triggers. Just use your imagination!
Take your mouse to the end of the screen if you haven’t done that till now, to experience the exit intent behavior trigger.
Inline
After installing and activating the “Inline” plugin, you find this new option under the “Type” drop down menu.
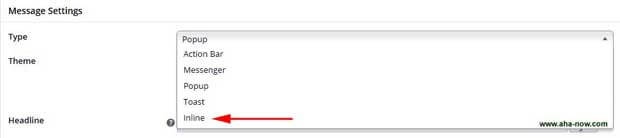

Yes, this is your fifth message type with which you can bring a message box anywhere on your page or post.
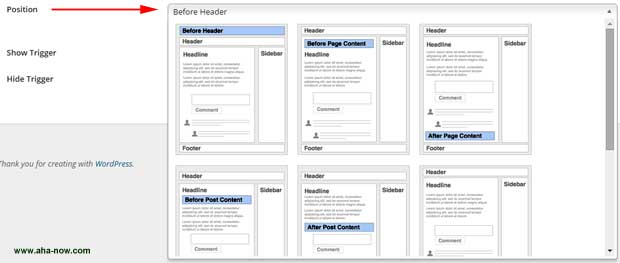

As you can see above, you can place your inline message box before header, before page content, after page content, before post content, after post content, and after footer.
You can also use it anywhere on your page or post using shortcode, as I’ve done below and throughout this part of the post (You need to click on the CTA button of all the inline messages):
[icegram messages=”15434″](Checkout the page, that opens in a new tab)
I like this, don’t you too?
CTA Actions
After installing and activating the “CTA Actions” plugin, you get a new “Button Action” option above the “Message Body”.
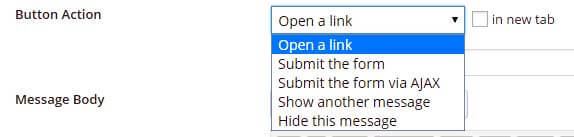

You can now associate an action of your choice with the CTA button like open the link in the post or in a new tab, submit the form simply or via AJAX, show another message, or hide the message.
Check out one of the CTA Actions below!
[icegram messages=”15441″]Well, what do you say? 🙂
Stickies
After installing and activating the “Stickies” plugin, you get a sixth message type!
It’s just a sticky with different templates and animations. All I can say is to check this out.
[icegram messages=”15448″]Aha! That’s really cute. 🙂
(If you’re on a mobile or tablet, you may not be able to see this stickie.)
Sidebars
After installing and activating the “Sidebars” plugin, you get a seventh message type, and that’s a sidebar.
The story of sidebar is explained below. 🙂
[icegram messages=”15453″]This works great on mobiles and tablets too!
(That offer you just saw is real, go for it!)
Geo Targeting
After installing and activating the “Geo Targeting” plugin, geographical location based targeting rules are added to campaigns.
This is how it looks on your campaign.


You’ve the option to specifically display your message to one or few select countries or global regions.
Overlay
After installing and activating the “Overlay” plugin, you get an eigth message type – the overlay.
As evident by its name, this message covers your entire screen. See it for yourself.
[icegram messages=”15469″]Be Blessed! 🙂
Badges
After installing and activating the “Badges” plugin, you are on ninth heaven. 🙂 This is the ninth message type that you have at your disposal.
So, it’s time to reward you. 🙂
[icegram messages=”15473″]You deserve it!
Ribbons
Okay, this is the last of the message types that the Icegram premium add-ons provide. Yes, it’s the tenth one.
Here’s is what I’ve for you.
[icegram messages=”15477″]Thank you for reading this review.
Oh, I need to tell you one more thing.
Even the non-WordPress bloggers can make use of the Icegram WordPress plugin.
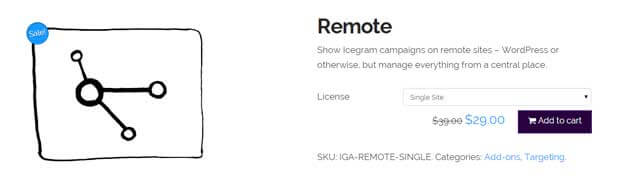
For that purpose, you need to have one WordPress blog where you can install Icegram. And then get the “Remote” premium add-on to show the Icegram campaigns on your remote WordPress or non-WordPress sites.

Read here for more information.
Also, do read the “Ideas & Inspiration” page on the Icegram site, see the working demos, and go through the posts on the Icegram blog to dig out more information on the Icregram WordPress plugin.
Conclusion
I’m impressed with the functionality of the Icegram WordPress plugin, even with that of its free version.
PROS:
Icegram is studded with stars, and its up to your imagination to reach out to them.
There are many more things you can do with Icegram than what’s shown in this review.
I give Icegram full marks and it’s definitely worth your money.
CONS:
I had a few doubts, and the Icegram support was quick to clear the picture to me.
At first, I could not completely understand how to make best and full use of the features Icegram offers.
I had to give sometime to study and use it thoroughly. But with this review, you won’t even have to do that!
There are hardly any cons, and I’m sure Icegram is going to get better with addition of more features and improvement in the future.
UPDATE: We are not using the Icegram plugin anymore. You may not be able to view some examples in the review that we had created using the plugin features. Instead, you will only see the shortcodes because the Icegram plugin is not installed on this blog.
You may download the FREE Icegram WordPress plugin today, try it out as explained in this post.
Do let me know what you think of this review.
Over to You –
What do you think of the Icegram WordPress plugin? Would you want to have it on your blog? Which is your favorite Icegram premium add-on? Share in the comments below.
Photo Credit: Icegram