
Table of Contents
Are you an excessive computer user? Does your job require you to sit and work for long hours using your computer or laptop?
If yes, then first you need to read this review on Ergotron Sit-Stand Workstation! Also, you should read this post by Harleena where she talks about the dangers of sitting and the benefits of standing.
The verdict is clear – you should stand more and sit less. That’s because sitting is the new smoking!
But how can you make that possible? When you work on a computer, you have to sit because you work on a sitting desk.
If you have a standing desk, then while working you can just stand, and not sit. Now, I know many of you would not like to stand for long hours, especially when you have to work.
No worries. As there is a solution to every problem, you can also stand more and sit less while working on your computer.
The answer is the Ergotron Sit-Stand Workstation. This is your sit-to-stand solution that makes it possible for you to sit as well as stand while working, whenever you feel like doing so.
Harleena gave a pretty good description of this equipment in the previous post along with an impressive demo video.
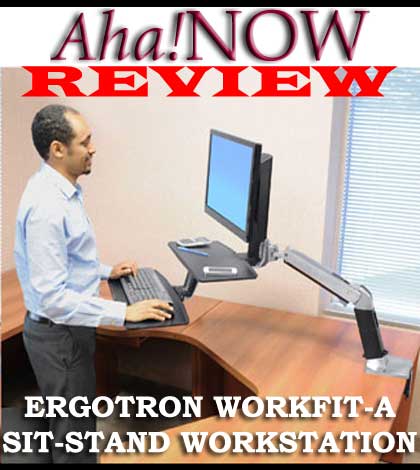
I’m taking the next step to review the Ergotron WorkFit-A Sit-Stand Workstation that we received from Ergotron.
Before accepting the review unit, we made it clear that we would be honest with our review. So, I have some positive as well as negative aspects to share with you about this sit to stand working solution.
Note: This product does not come with the computer accessories as shown in the image like the monitor, keyboard, mouse etc. You only get a workstation with a stand where you can mount these computer accessories.
This is a descriptive review that includes the installation process. So those who are short of time and just want to know my personal experiences and views about the Ergotron WorkFit-A workstation, can click here to jump over to that section.
Probably, you’d then like to go through the entire post. So, why not do it now! 🙂
Review of Ergotron WorkFit-A Sit-Stand Workstation
(Ergotron WorkFit-A with Suspended Keyboard, Single LD (24-390-026))
The sit-stand workstation that I’m reviewing here is little different from the one you saw in the video in Harleena’s earlier post.
You’ll understand once you explore the Ergotron website, which showcases many variations and types of workstations.
In this post, I’m reviewing a particular model of the WorkFit-A series, one with a worksurface and suspended keyboard. You can use only one light duty monitor with this model.
There are many other models also in this series as you can see on the Ergotron website.
I’m going to make this a three-part review post.
- The first part focuses on unboxing and getting to know the components of the sit-stand workstation.
- The second part explains the entire assembling and installation procedure in detail.
- The third and final part is based on my personal experiences of using this sit-stand workstation.
Okay, so we are going to start from the basics. The first step is to open the boxes.
Unboxing the Sit-Stand WorkFit Unit
We received one huge box along with one small box, which is optional (It contains an attachment for laptop that needs to be ordered additionally at an extra/additional cost).
The big piece was about a little less than 3 feet in length, 2 feet in width, and about 1 feet in depth.
The two boxes together weighed about 21.5 kg (That’s about 47 lbs).


The contents of the box are laid out in 3 layers separated by thermocol packaging pieces.
In the first layer, you’ll find one worksurface and some tools along with the instruction manual.
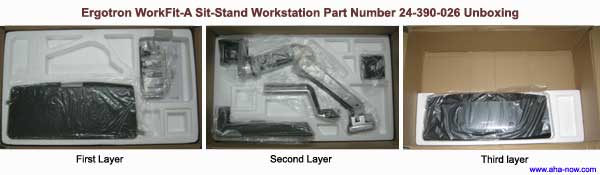
The second layer has the main components.

It has the sturdy arm along with the clamp that weighs about 8 Kg. This is what bears the entire load and makes the maneuvering possible.
Also included are a monitor riser, monitor pivot, and keyboard tray support bracket.
The third layer has the keyboard tray.
However, if you are going to order a different model, you might have less or more things.
The unboxing is complete and it takes about 15 minutes if you do it slowly. Now, we move on to the major part.
Assembling and Installing Your Ergotron WorkFit-A Workstation
The first thing I did was to go through the instruction manual. It is depicted with illustrations explaining about the installation process.
However, personally I find that the instruction manual they have online is better than the printed one I got along with the workstation unit.
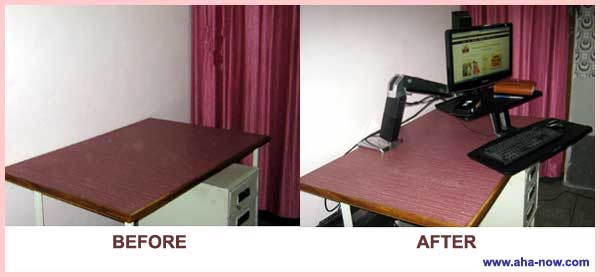
Before we start, have a look at the before and after picture of the installation we carried out at home.
I’m going to divide the entire assembling and installation process into simple steps that will be easy to follow.

Important: You need to have two main tools ready with you – a crosshead screwdriver and a hex socket wrench before you start.


These were all I needed besides the tools that came along with the Ergotron workstation package. You can use the ones that you’ve over at your place if they serve the purpose.
Step 1: Decide Where to Install
This is crucial because there are certain procedural changes for different types of tables. You may have a table of –
- Breadth of about 2 feet or less
- Breadth between 2 to 2½ feet
Also, check whether the table you want to use has a grommet hole or you would prefer using a clamp (I used the clamp).
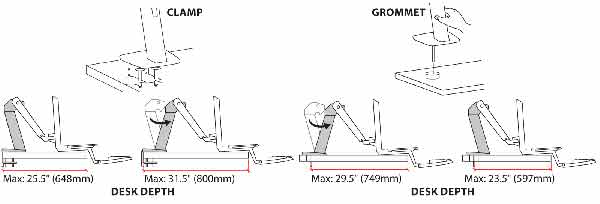

Make sure the width of the “tabletop” is about an inch or two and is made up of a strong and sturdy material like wood or metal that can bear the load of the sit-stand workstation and the computer components.
If you have a grommet hole on the tabletop, ensure it’s about an inch or two in diameter and located in a position as depicted in the instruction manual.
Note: Please make sure you have space all around the table to move the entire workstation to its left and right.
Step 2: Clamping the Arm
You need to be careful with the arm as it is a bit heavy and you might need a helping hand. It has got the clamp attached to it at the base.
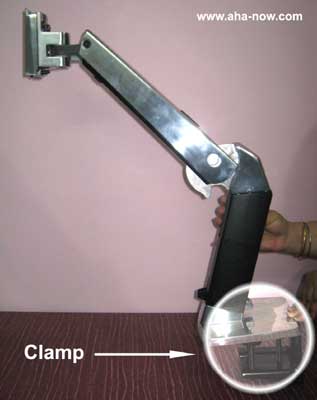
If you want to install the arm in a grommet hole, you need to remove the clamp and make some minor changes as instructed in the manual.

All you have to do is to position the tabletop edge into the groove of the clamp, push the clamp against the edge and tighten the screw at the bottom of the clamp.
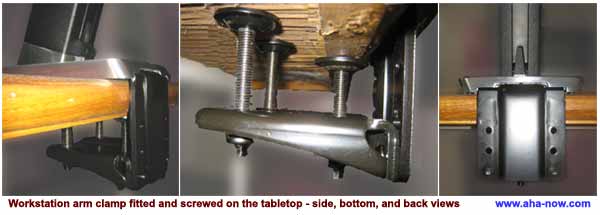

Note: Make sure that the clamp is fitted tightly because if it remains lose, the entire unit can become unstable and fall. Screws must be tightened at all stages to keep the product secure.
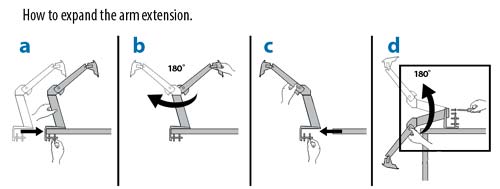
Step 3: Expanding the Arm Extension
Since the arm comes factory-ready to be installed on a 2 feet wide table, I had to change the orientation of the arm to make it fit on my table that is about two and a half feet (30”) in breadth.
If your table is 2 feet in breadth, then you can skip this step.


You need to rotate the upper part of the arm at the base as shown in the image through 180 degrees.
The resultant arm now faces the opposite direction but the direction of the base remains unchanged.
This was not easy to do as I found the arm too tight and unmovable. So, what I did was to bend the upper arm and then rotate it – this was easier.
Once rotated, you need to unscrew and unclamp the arm so you can put it on the table facing down as show in the image below.
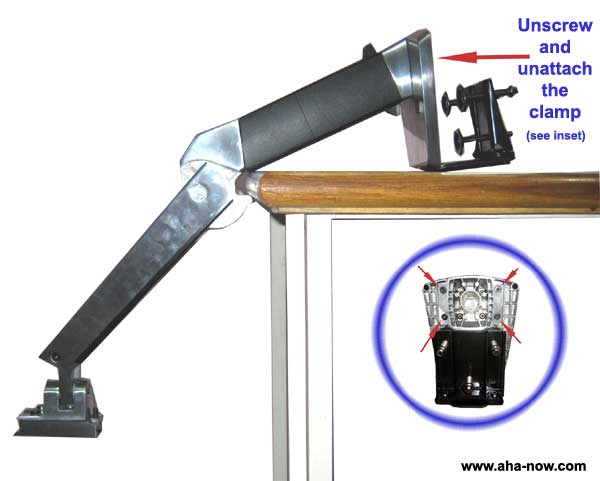

Just remove the four screws that are shown in the inset to un-attach the clamp. Then you have to turn the arm 180 degrees and reattach the clamp to the other side of the arm base.
Finally, the arm is extended and it is ready for a 2½ feet wide table.
This is how the expansion of the arm extension is shown in the instruction manual.

While you are re-clamping the expanded arm onto your desk, you can also adjust the clamp according to the width of the tabletop.


Just unscrew the screws marked by red arrows to re-insert and screw in other slots marked in blue. You will need to do that if your tabletop width is thin.
Note: It is imperative to ensure that the mounting surface is strong enough to handle the mounted equipment.
Step 4: Preparing the Monitor and Keyboard stand
Take out the monitor riser and the keyboard support tray bracket from the box.
Make the monitor riser stand vertically on its base and join the extending arm of the keyboard support tray bracket to it such that it forms an “L” shape with a protruding tail.
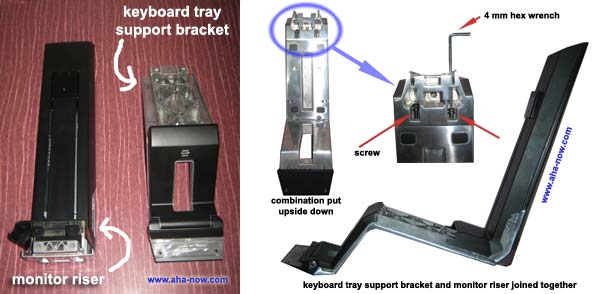

After joining both of them, put the combination upside down. Find the location as shown in the image to insert two screws as instructed in the manual, and tighten them using a 4mm hex wrench.
This combination of monitor and keyboard stand is now ready to be fixed to the arm of the workstation that you already clamped on the tabletop.
Step 5: Putting the Workstation Altogether
Below is the before and after image of fixing the monitor riser and keyboard tray support bracket on to the arm of the workstation.
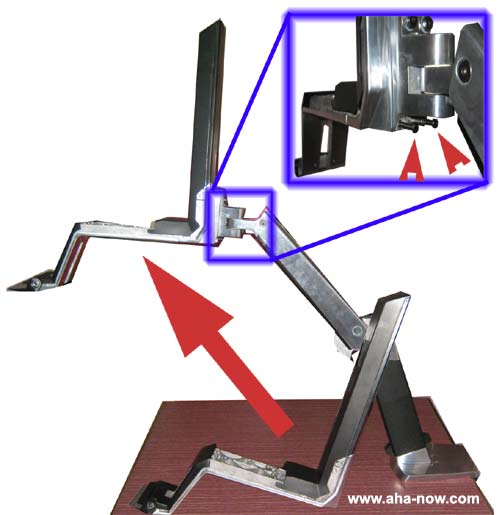

Tighten the two screws by turning the combination to one side, so you can easily use the screwdriver.
Only three things remain to be attached – the keyboard tray, worksurface, and the monitor pivot.
- Keyboard Tray – Place it as shown in the image and tighten two screws at the bottom.
- Worksurface – You will need to use the screwdriver as shown in the image to tighten two screws.
- Monitor pivot – Use the 4mm Allen wrench to tighten one screw with hex socket.


Your sit-stand workstation is ready now!
All you need to do is place your computer accessories and monitor on it.
Health Tips: Heart rate increases by 10 beats per min while standing with 50 extra calories burned per hour. More reasons you need to stand and work by using the Ergotron Sit-Stand Workstation!
Step 6: Mounting the Monitor and Computer Accessories
Placing the keyboard and the mouse on the keyboard tray is no big deal. Furthermore, you also have velcro strips in your toolkit to stick the keyboard onto the keyboard tray.
You can then fold the keyboard tray whenever not in use and that creates more space for you.
To mount your LCD or LED monitor up to 24 inches size, the first step is to detach the base, which can be done manually. The image below shows you the position of the screw that needs to be opened.
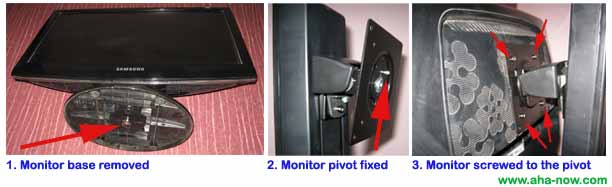

Next, you need to fix the free rotating monitor pivot by inserting a screw in the upper right corner. You can skip this step if you want to rotate your monitor between its horizontal and vertical positions.
Lastly, use four screws to fix the back of the monitor to the monitor pivot as shown in the image. Please note that you can only use those monitors that have the threaded holes at the back for wall mounting purpose.
Health Tip: No leg movement and less fluid intake risks the formation of clot in your legs. This can eventually lead to cardiac arrest. Tweet
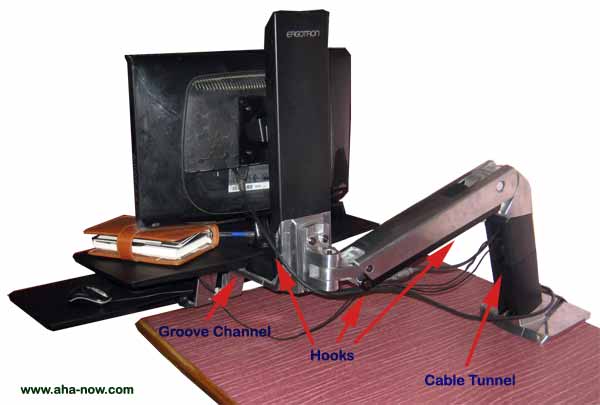
Step 7: Attaching and Managing the Cables
Finally, you attach the display and power cords to the monitor, carry them along the body of the arm, and pass them through the tunnel provision provided near the base of the arm.
You also have provisions to hook and tie the cables on the monitor riser and the arm.

One thing you need to make sure is that your cords and cables are lengthy enough to reach your computer unit.
Luckily, my monitor display and power cords were long enough. If yours are not, then you can order the longer cables along with your sit-stand workstation.
I had to purchase only two USB cables to extend the cables of the keyboard and mouse. However, if you’re using the wireless keyboard and mouse, then you don’t have to worry about them.
That’s it. This is the end of the installation of the Ergotron WorkFit-A Sit-Stand workstation. Even if you have some other models, many of the steps followed here might be the same for them.
The entire unboxing, assembling, and installation process took me about three hours (including the time taken in clicking the pics!) But, if I had read a post like this or watched any installation video, it might have taken less time.
Note: If you need help, you can always call the Ergotron experts for installation, set-up, and maintenance services.
Here is a video that demonstrates the entire installation process. There is no narration or dialogues as everything is self-explanatory, especially after you’ve read this post.
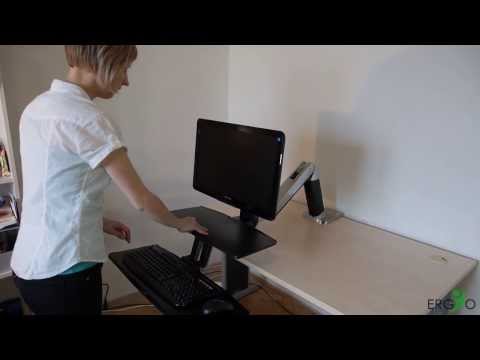
Ergotron WorkFit-A Installation ~ YouTube Video
Ergonomic Tip: Your keyboard should be at the height of your elbow for ergonomic computing, so accordingly adjust the height of your desk, chair, and footrest.
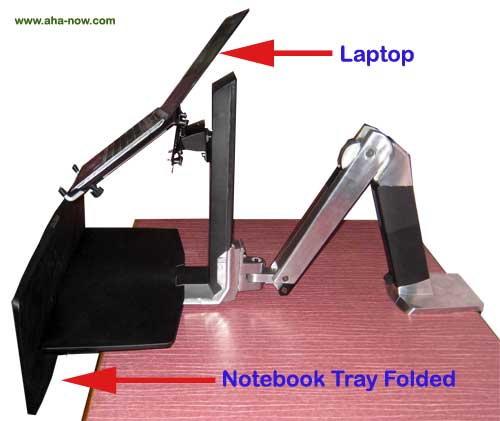
Mounting the Laptop
You can also use the WorkFit-A sit-stand workstation if you have a laptop or notebook by ordering the additional LX Notebook Tray, just like we did.
All you need to do is that instead of mounting the monitor, you mount the notebook tray onto the monitor pivot.
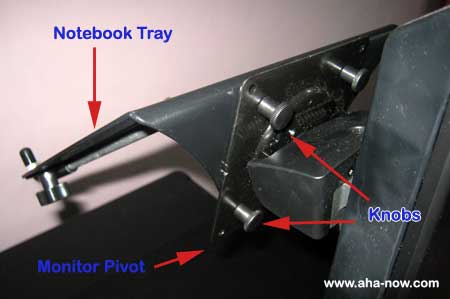
The notebook tray looks like as shown in the image below.

You can place your laptop/notebook in the tray and also adjust the length of the L-shaped rods (meant to stop the laptop from falling) to suit the size of your laptop/notebook.

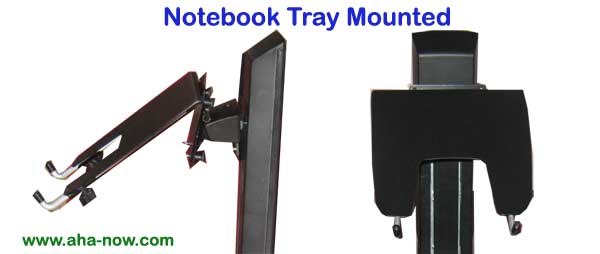
Finally you can fix the laptop/notebook to the notebook tray with the help of Velcro strips and pins provided in the toolkit.
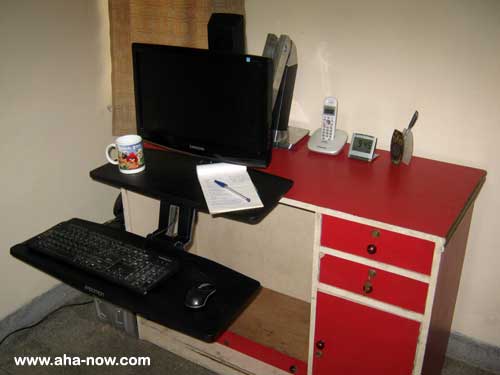
The final set up looks like as shown in the image below.
This was the installation of the Ergotron WorkFit-A sit-stand workstation on a two and a half feet wide table. I also installed it on a table of 2 feet breadth.
Here’s how it looks:


Health Tip: To Reduce Fatigue, do the following
Breathe deeply through your nose.
Blink often to avoid dry eyes.
Take a break every 2 to 3 minutes after every 20 minutes of work, or 15 to 20 minutes every 2 hours.
Final Review of The Ergotron WorkFit-A Sit-Stand Workstation
The assembling and installation of the workstation was surely a tedious job. If you are doing it for the first time, it will take you some time.
But then, it’s a one-time job, so doesn’t matter if it takes some time. It’s better to go slow and be sure about every step so that the unit is set up well once and for all.
I’d not rate the entire procedure as an easy job. Some people might even need professional help to install the workstation at their place. But if I can do it, you can too!
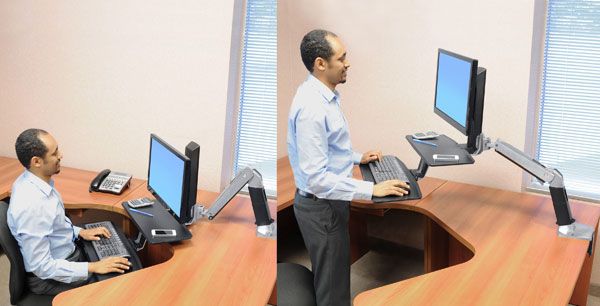
My Personal Experiences Using the Sit-Stand Workstation
I’ve used the Ergotron WorkFit-A sit-stand workstation for over a month and I’ve observed and analyzed it from all aspects.
The good personal experiences were that I could:
- sit or stand whenever I wanted to and still work on the computer
- easily move the workstation in any direction and even swing it away when not in use
- place essential things like mobile, notepad, or my coffee mug on the worksurface and have access to them in any direction or position
- fold the keyboard tray when not in use or when using the laptop
- adjust the monitor height and angle easily
- follow all the ergonomics rules for healthy and efficient working
- have access to the entire table without my computer occupying even a bit of it
Also, remember that you need to adjust the angles and settings of the equipment as per your requirement and use.
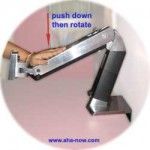
For instance, initially the workstation used to keep falling as I lifted it. This needs a little adjustment of tightening a nut and now I can raise the workstation to the required height and keep it there.
The instruction manual guides you on how to go about making the various adjustments.
The only negative aspects were that the workstation looked bulky and working on the laptop was difficult if you wanted to write long while having it mounted on the notebook tray.

Apart from my personal experiences of using the Ergotron WorkFit-A sit-stand workstation, here are some pros and cons from a general point of view:
PROS
1.No Posture Problems: My work requires long hours of sitting. Even though I’ve an ergonomic chair, it was not possible to maintain a good sitting posture all the time.
However, with the sit-stand workstation, I can easily get rid of the problems of bad posture and avoid getting tired sitting or suffering form back pain by standing up and working. More so, the workstation enforces the right way of sitting and working on a computer desk.
2. No More Lethargy: Now that I use the sit-stand workstation, I tend to stand more and sit less. This gives me more time and reason to move around while working.
Since it is easy to maneuver the workstation, I keep changing its direction and my standing position. I feel more energetic and ready to move as compared to working while sitting, which usually made me feel more like in a state of inertia.
3. Better Working Experience: Whenever I want to use my desk as a writing desk, I can just move away the entire workstation to one side. I then have access to the entire table.
I also don’t have to purchase a computer table with a keyboard tray. I used my existing writing desk. The workstation gives me a clean and clear working space that gives me a better feeling while working.
4. Increased Productivity: Blogging is no easy task. I’ve to sometimes extend my working hours and reduce my sleep time. I know that is not a good thing to do, but sometimes blogging is too demanding.
At such times, I usually unintentionally doze off while sitting on the chair. But with the sit-stand workstation, I make sure to stand and work to ensure I’m fully active and productive.
5. More Fitness: Since I started using the Ergotron sit-stand workstation, I feel fit. I somehow find more time to engage in fitness enhancing activities.
Now, as I wait and get some time in between the operations of my computer activities, I love doing push-ups against the wall, stretch my body, do some floor exercises and squats, or workaround with the dumbles.
6. More Healthy: I lost about 1kg of weight in the previous one month after I started using the sit and stand workstation.
Though there can be various reasons for losing weight, but I feel that my standing more, moving around, and performing fitness activities while standing and working has a big role to play.
Overall, I’ve an enhanced feeling of wellness. I can experience the positive physiological changes that make me psychologically more positive and happy.
Also, at any time, I can convert my sit-stand workstation into a treadmill computer desk. All I have to do is lift the workstation and put it above the treadmill. The keyboard tray can lie over the treadmill front portion.
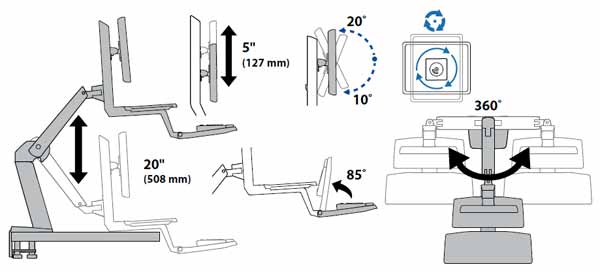
Note: Your WorkFit-A workstation is highly flexible. It has six degrees of flexibility as shown in the image below.

CONS
Honestly, I did not find any fault with the sit-stand workstation unit that I received from Ergotron. It is robust, steady, working perfectly fine, and looks elegant as well as sophisticated – definitely well-engineered!
Now, this is not something to blame on the workstation, but my table width is not as per the specifications.
As a result, the workstation protrudes a little, such that the keyboard tray lies farther from the tabletop edge than it should.
So, you need to take care that your table should be as per the specifications of the workstation, else the workstation would look bulky.
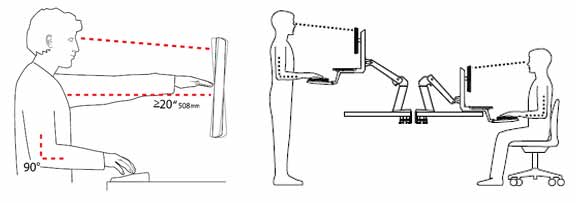

Working Tips: Follow these tips for the proper working on a computer desk while sitting or standing.
Height > Position the top of the screen slightly below your eye level. Position the keyboard at your elbow’s height keeping your wrists flat.
Distance > Position the screen at an arm’s length from your face—at least 20” (508mm). Position the keyboard close enough to create a 90˚ angle with the elbow.
Angle > Tilt the screen to eliminate glare. Tilt the keyboard back 10° so that your wrists remain flat.
CONCLUSION
I strongly recommend the Ergotron WorkFit-A Sit-Stand Workstation. It is an added asset and definitely a facilitator of health and happiness in life.
It helps to decrease leading a sedentary lifestyle and improve your life by keeping the lifestyle diseases at bay.
I totally agree with some of the facts as mentioned in the Ergotron workstation manual that it helps:
- Burn extra calories
- Tone muscles
- Improve posture
- Increase blood flow
- Ramp up metabolism
No doubt the Ergotron WorkFit-A Sit-Stand Workstation promotes healthy working behavior and habits. It is value for money and definitely worth the investment.
You can read more about the product and its specifications on the Ergotron website or on Amazon.
Here is my final rating score for the Ergotron WorkFit-A with Suspended Keyboard, Single LD (24-390-026) :
Equipment Quality – 5/5
Assembling & Installation – 4.5/5
Usage – 5/5
Value for Money – 5/5
Overall, it’s a must-have utility for excessive computer users and gets my full appreciation and marks. 🙂
One lucky Aha!NOW Blog Community member will win one FREE Ergotron WorkFit-A Sit-Stand workstation by virtue of topping the ABC Leaderboard by accumulating the most AhaPoints.
Look out for the results of the giveaway we held recently, which will be announced on 3rd November.
But don’t be disheartened if you’re not the winner because there are many cheap deals out there on Amazon (Aff link).
You not only get the Ergotron workstations on discounted rates, but you may also get the option to pay in six interest-free installments on purchase from Amazon, if your credit card is approved.
I hope you liked this review, and if you’re already a proud owner of the Ergotron WorkFit sit-stand workstation, I’m sure you’d be able to relate to this post. 🙂
Share Your thoughts:
What impresses you most about the WorkFit sit-stand workstations from Ergotron? If you’re already a user, then share your installation and working experience, and if not, would you want to buy one?
Photo Credit: Ergotron
RELATED POSTS:
Is Your Sitting Posture Correct
Warning: Sitting Is The New Smoking
Why Use Standing Desks Or Sit to Stand Workstation
Disclosure: I’ve used my affiliate link in this post and I’ll make a small commission off the purchase price at no additional cost to you.